
Users
Account Owners and Administrators can add, invite, and manage users and always have access to all folders. Other users get access through Roles or direct folder access, while Permission sets define what they can do in each folder.
Add users
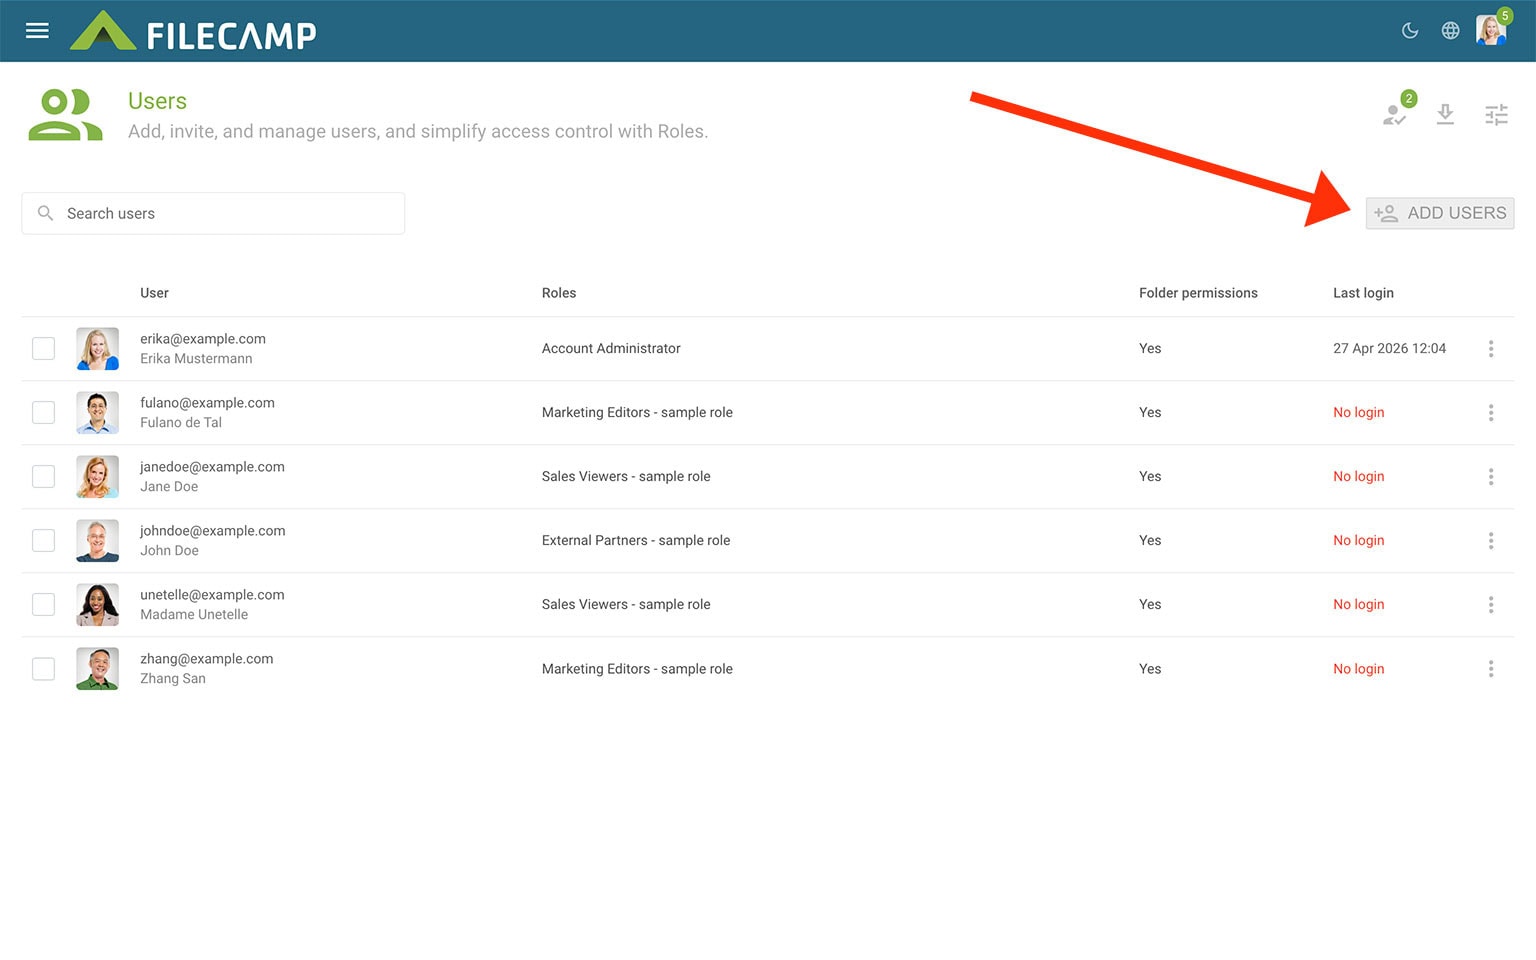
To create new users, click the  Add users button in the Toolbar.
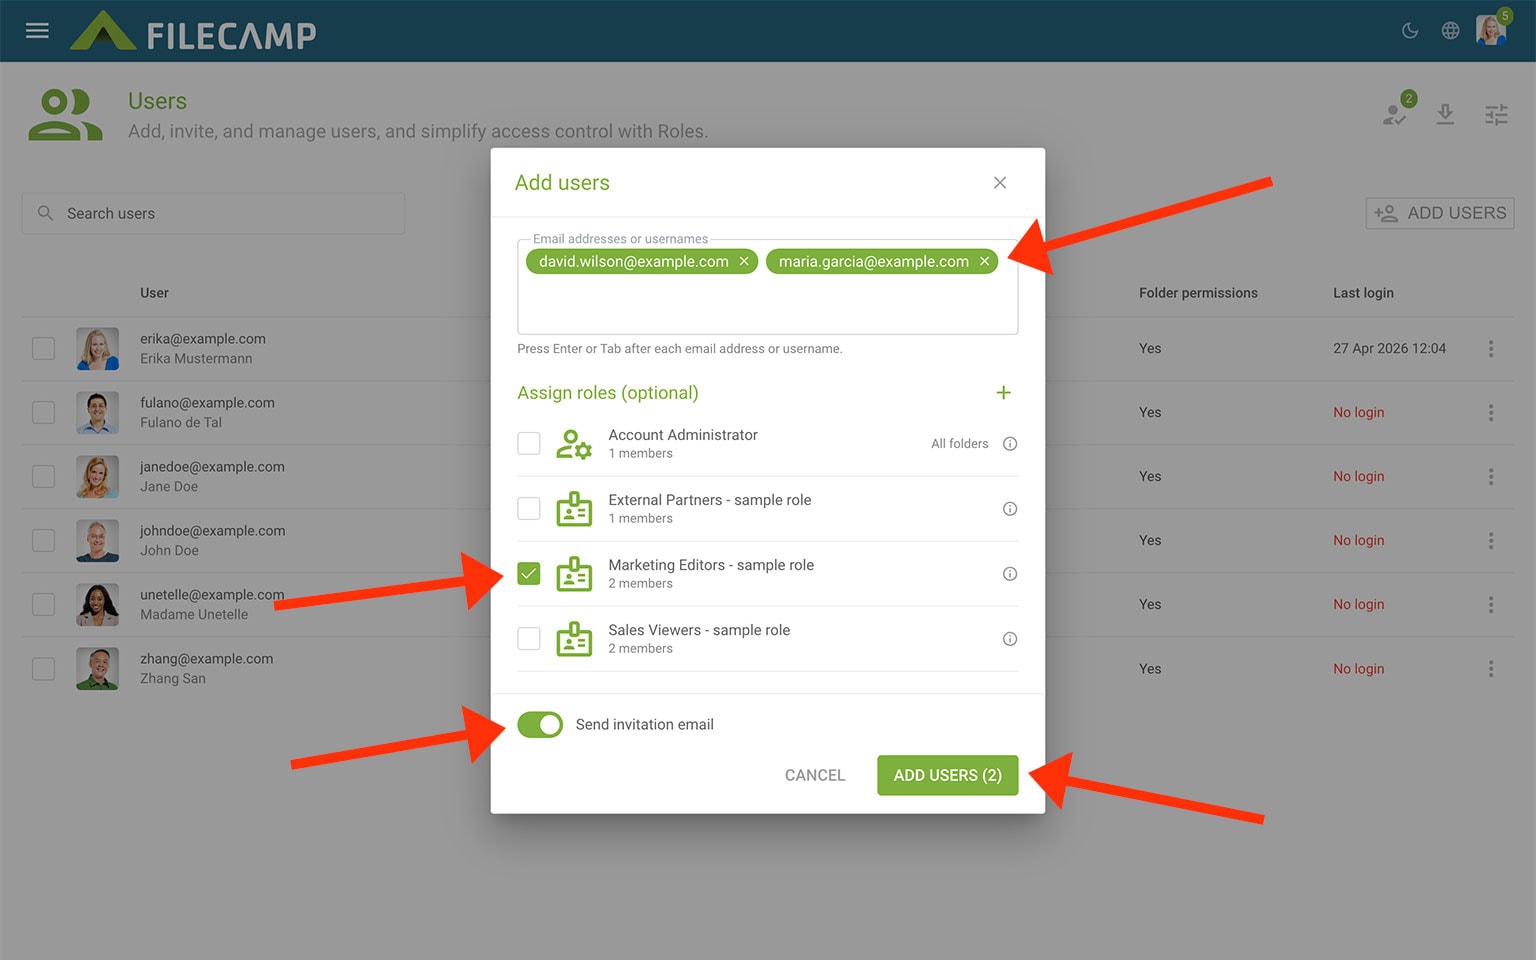
Enter one or more usernames or email addresses. You can add multiple users by entering more usernames or email addresses. Separate them with commas, spaces, or line breaks.
You can assign one or more Roles while adding the users. Assigning a Role is optional. If needed, you can also create a new Role by clicking the + icon.
Check Send invitation email if you want to send an invitation to users with email addresses.
Click ADD USERS, and the new users will be created and shown in the Users list.
If you do not assign a Role when adding a user, you can assign Roles or give the user direct folder access afterward.
Important: A user without a Role or direct folder access will not have access to any folders.
Notice: We recommend using email addresses as usernames. This allows users to receive invitations, reset their passwords, and manage their own notifications.
Tip: If you do not assign a Role when adding a user, you can assign Roles or add direct folder access later from the user’s details panel.
Important: If a user has no Roles and no direct folder access, the user will not have access to any folders.
Editing a user
Navigate to Admin > Users.
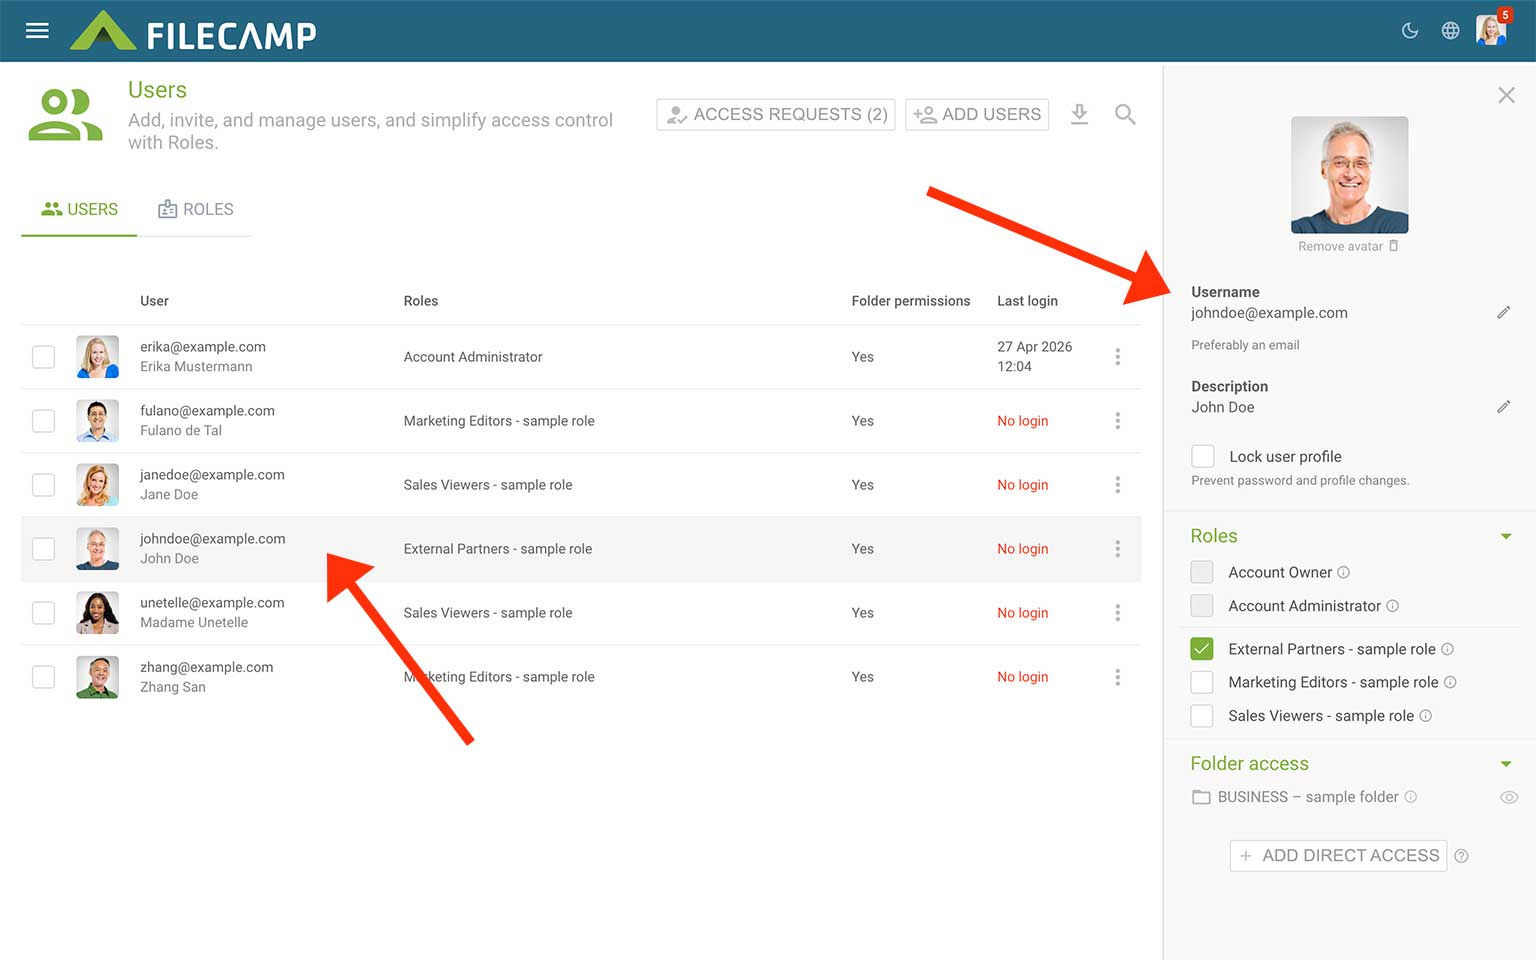
Select the user you want to edit. A panel will appear on the right, where you can view and change the user’s details and access.
You can manage:
- Username – preferably the user’s email address.
- Description – for example the user’s real name, company, department, or function.
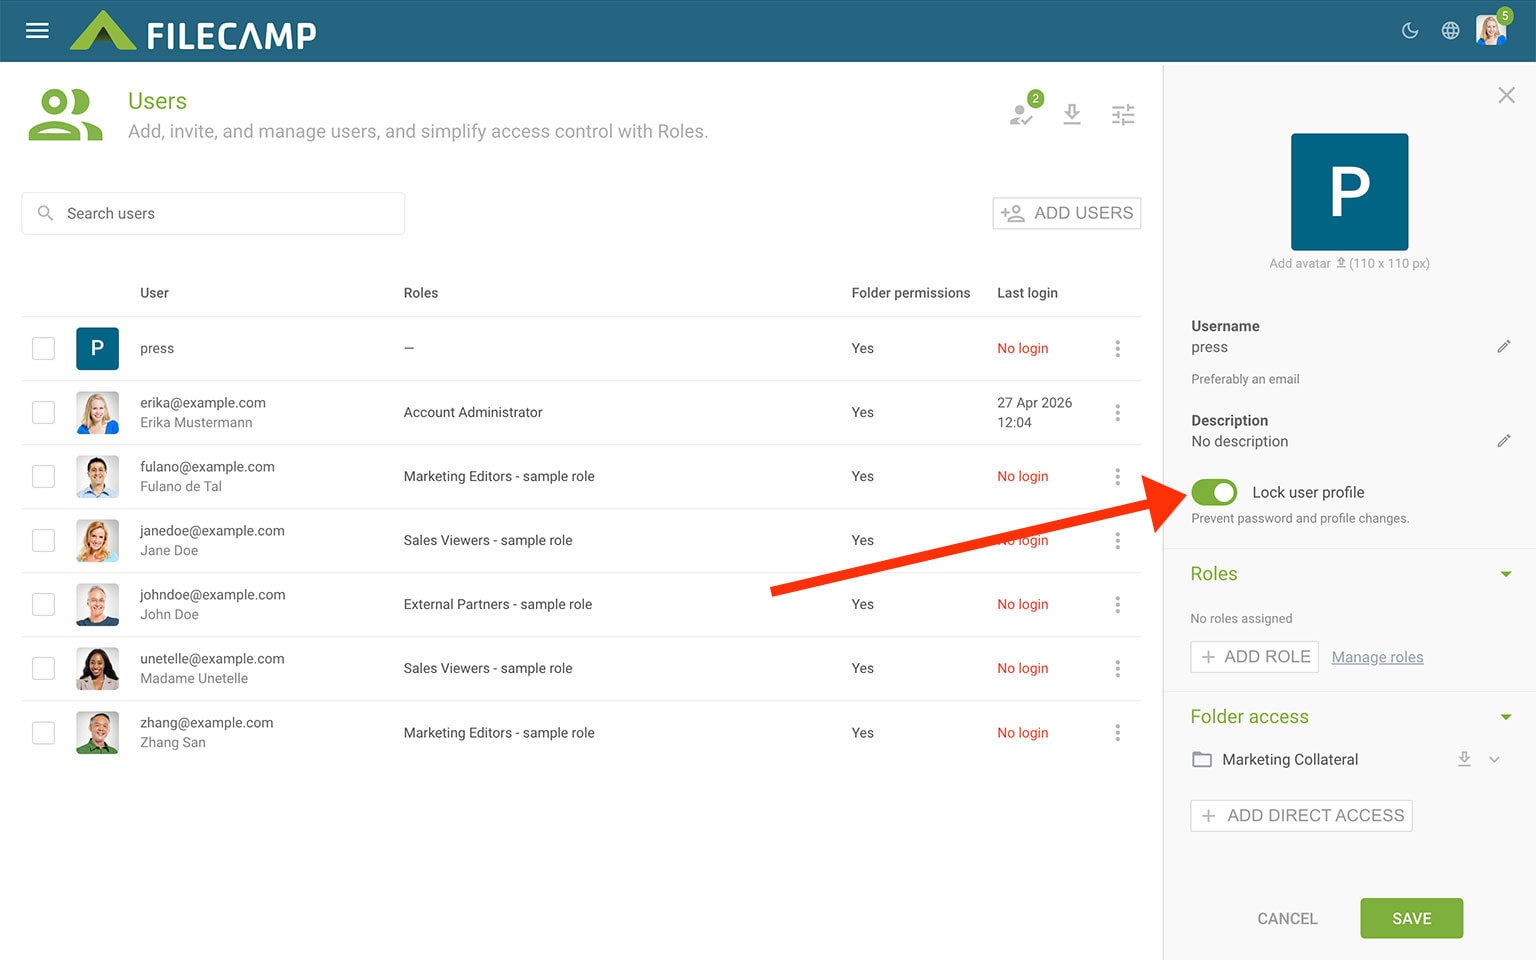
- Lock user profile – prevent the user from changing their password and profile details.
- Roles – assign or remove Roles from the user.
- Folder access – review access inherited from Roles and give the user direct access to additional folders.
Folder access received through a Role is shown together with any direct folder access assigned specifically to the user.
User settings
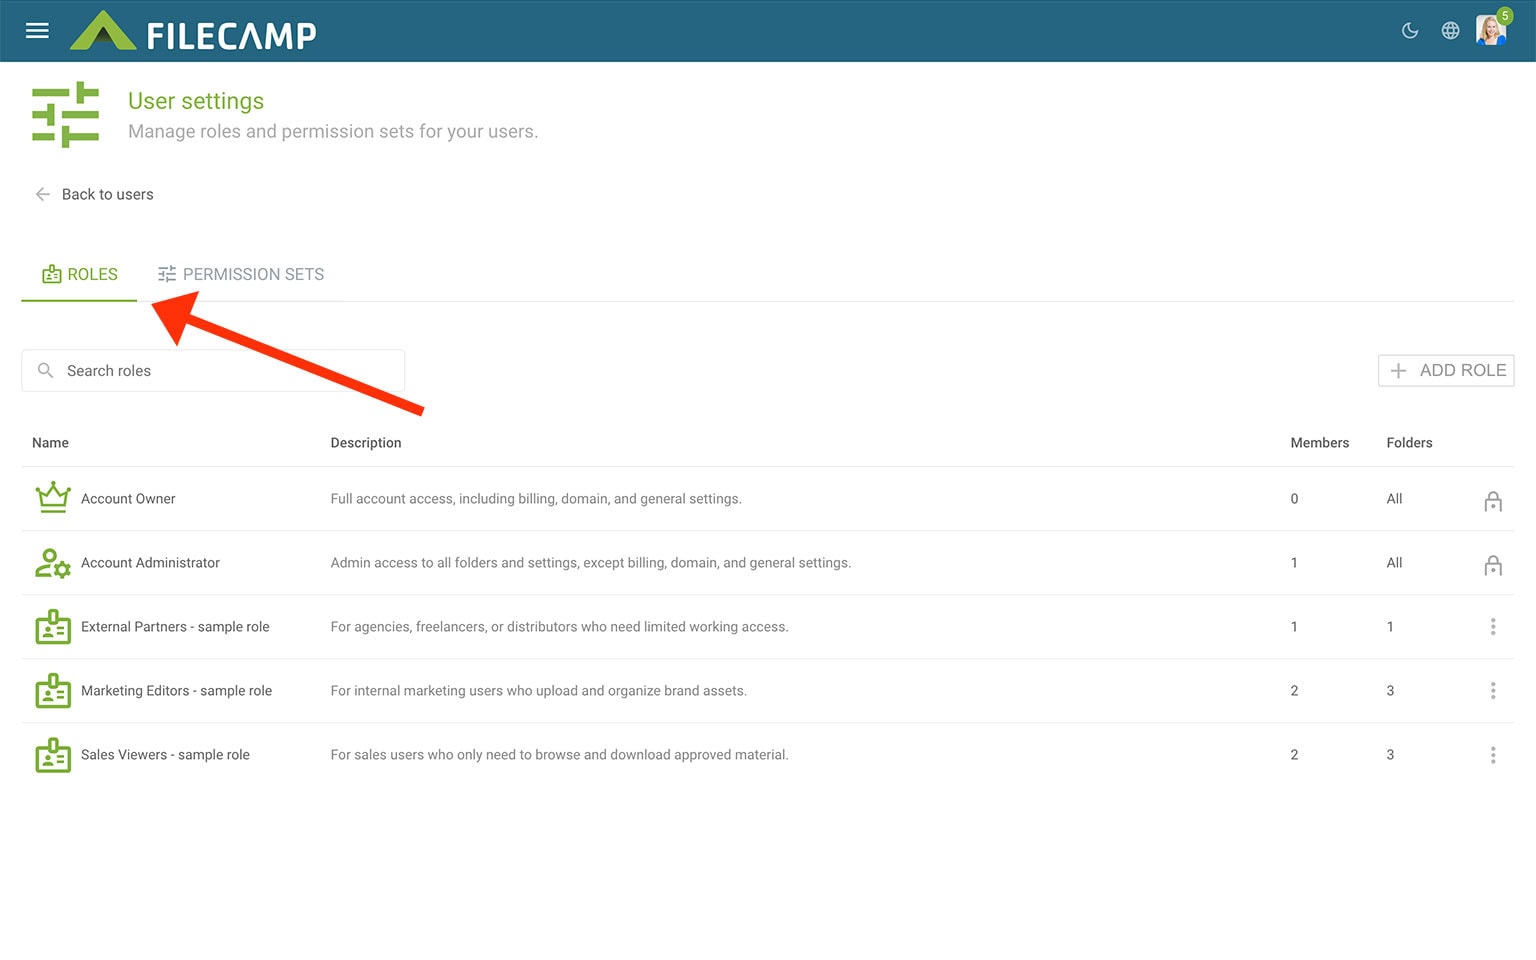
Roles and Permission sets are managed from User settings.
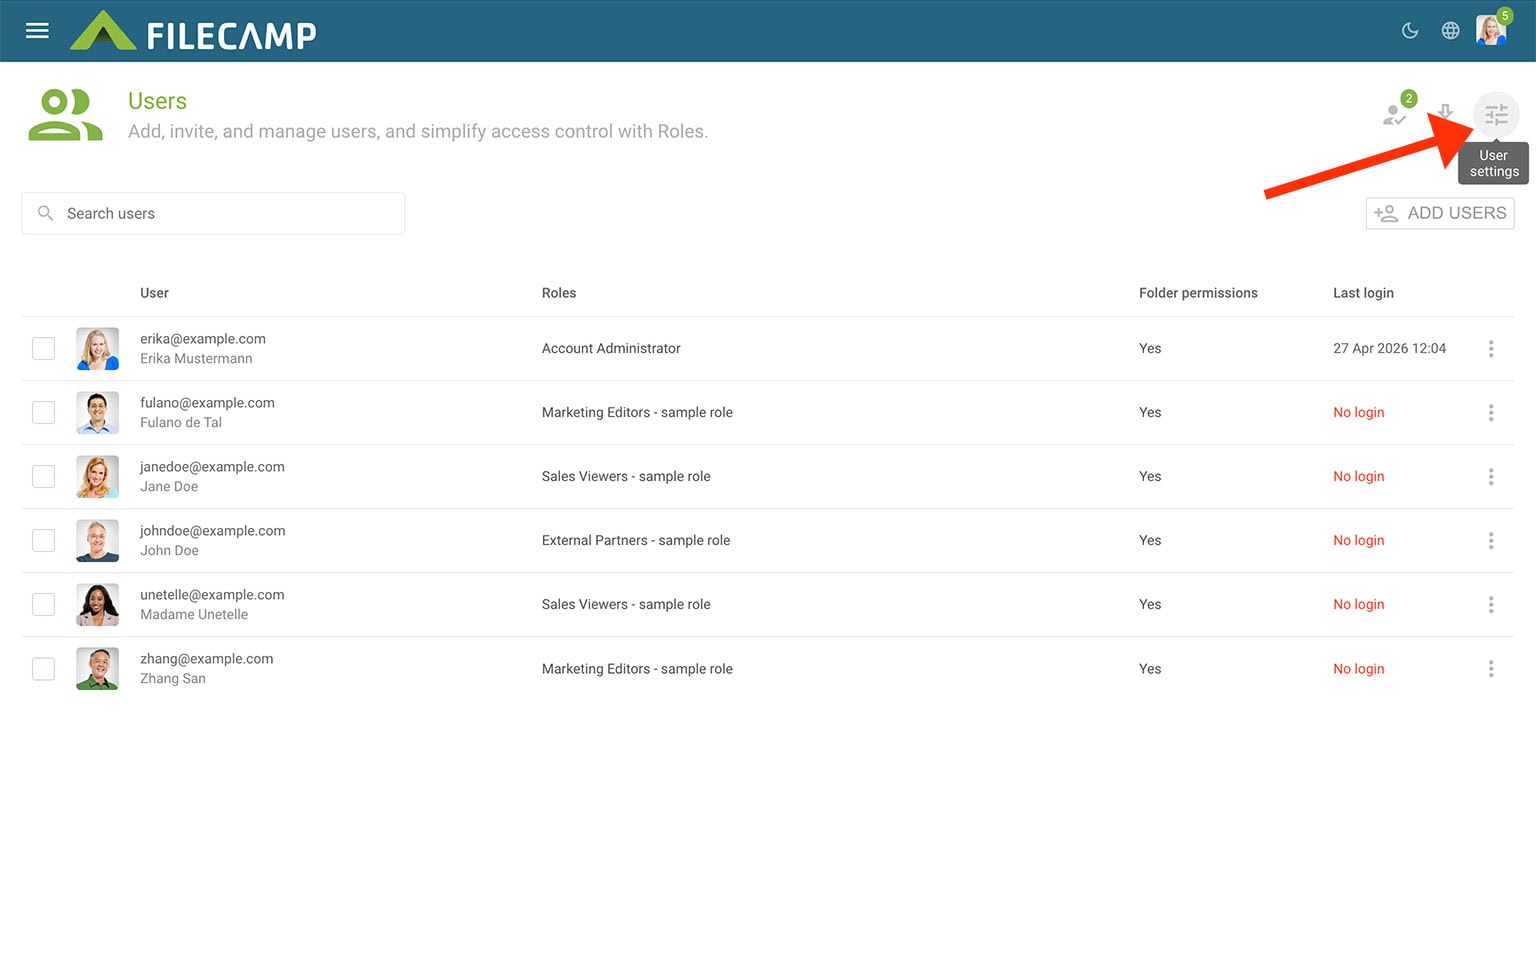
Navigate to Admin > Users and click the User settings icon in the upper-right corner.
User settings contains two sections:
- Roles – group users together and give them access to specific folders.
- Permission sets – define what users are allowed to do inside those folders.
A simple way to think about it is: Roles define where users have access, while Permission sets define what they can do there.
Roles
Roles make it easier to manage access for multiple users. Instead of assigning the same folder access separately to each user, you can create a Role and assign all relevant users to it.
For example, you could create Roles such as:
- Marketing Editors – access to selected marketing folders using the Editor Permission set.
- Sales Viewers – access to sales material using the View and download Permission set.
- External Partners – access to selected client folders using the Permission set that fits their needs.
A user can belong to more than one Role.
When you change the folder access for a Role, the change applies to all members of that Role.
A user’s folder access can come from both Roles and direct folder access.
Create or edit a Role
Navigate to Admin > Users > User settings > Roles.
Click ADD ROLE to create a new Role, or select an existing Role to edit it.
For each Role, you can manage:
- Name – for example “Marketing Editors”.
- Description – optional information about what the Role is used for.
- Folder access – the folders the Role can access and the Permission set used for each folder.
- Members – the users assigned to the Role.
Click ADD FOLDER to give the Role access to another folder. Select the Permission set that should apply to that folder.
Click ADD MEMBERS to add more users to the Role.
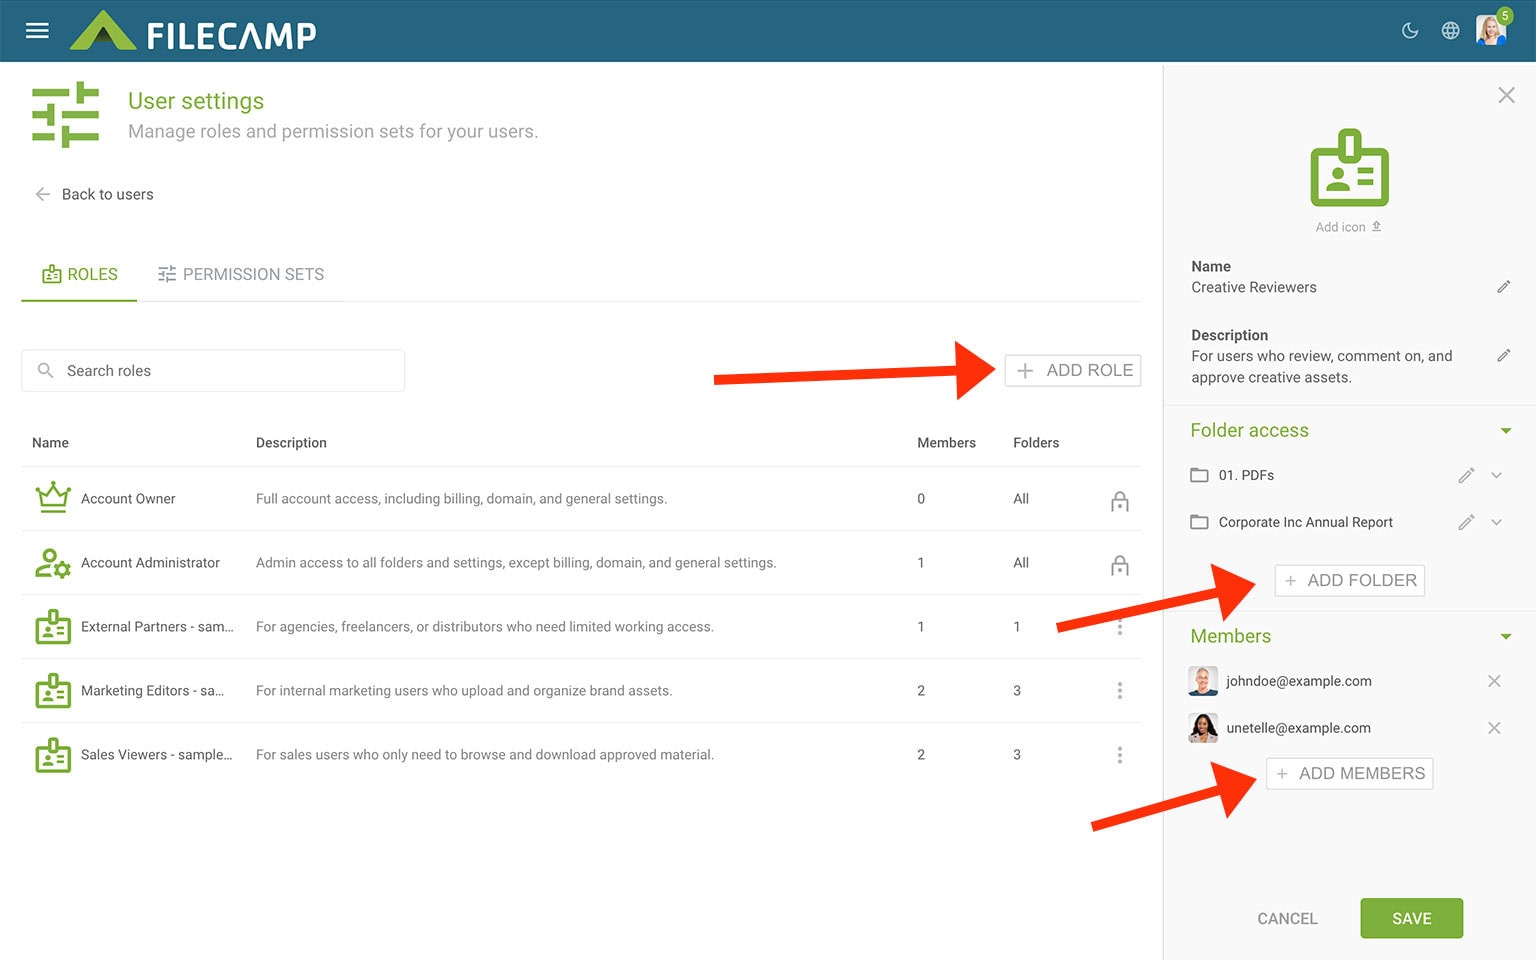
Tip: Different folders in the same Role can use different Permission sets.
Add selected users to a Role
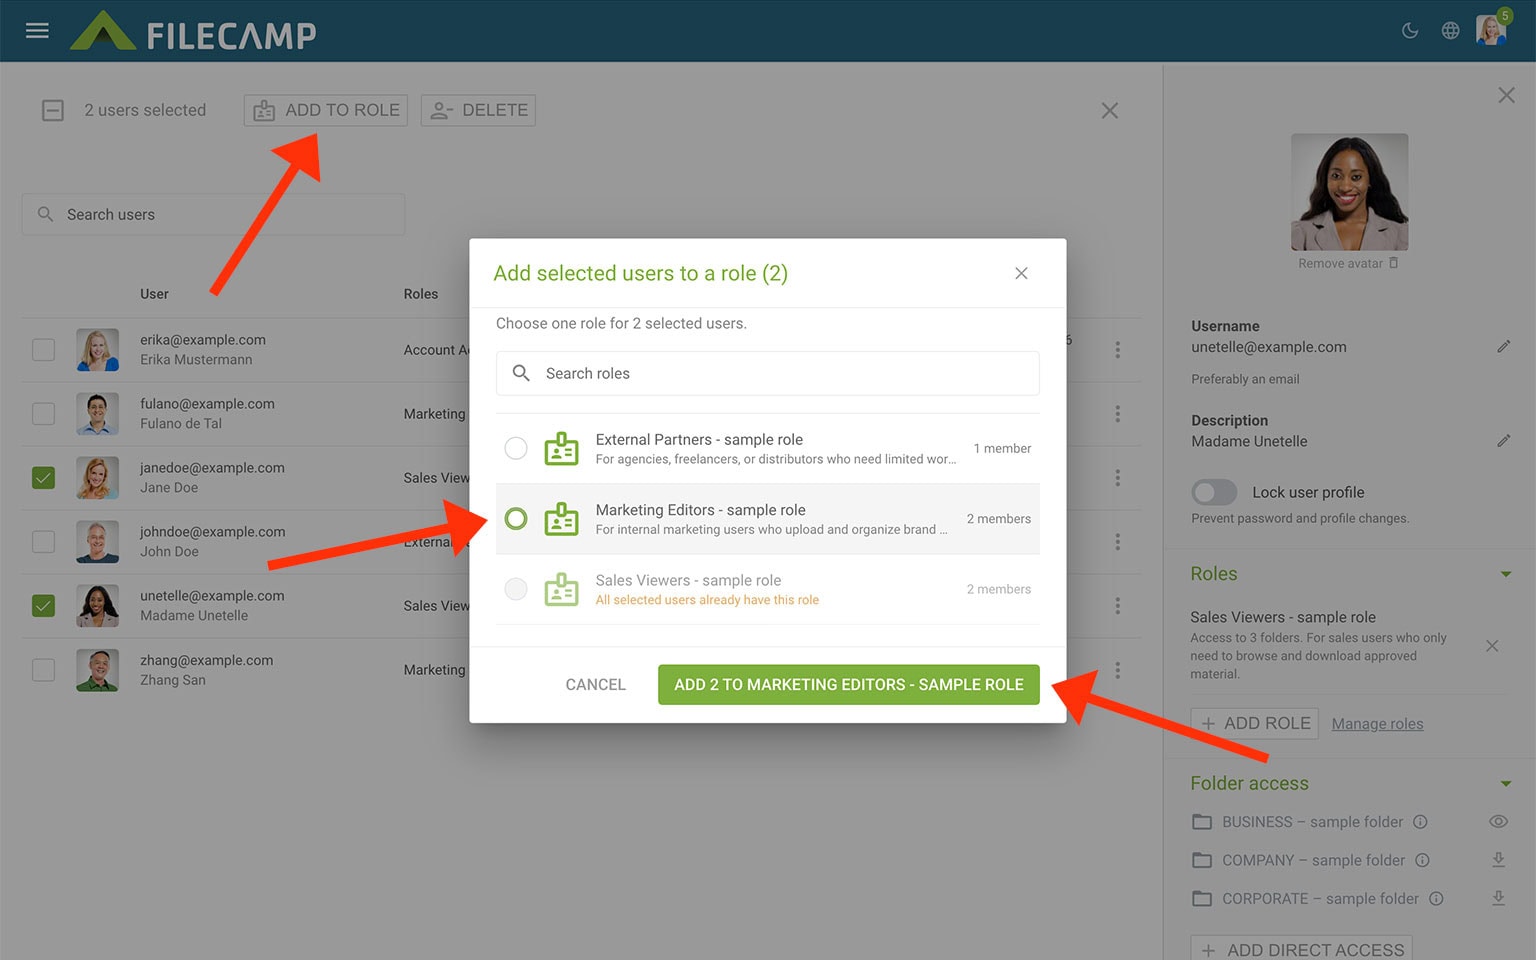
You can add several existing users to a Role at the same time.
Navigate to Admin > Users and select the users you want to add.
Click ADD TO ROLE in the Bulk Action Bar.
Select the Role you want to add the users to. You can use the search field to find a Role faster.
Click ADD TO ROLE, and the selected users will be added to the Role.
Tip: Use Roles for access that should apply to several users. Use direct folder access only for individual exceptions.
Permission sets
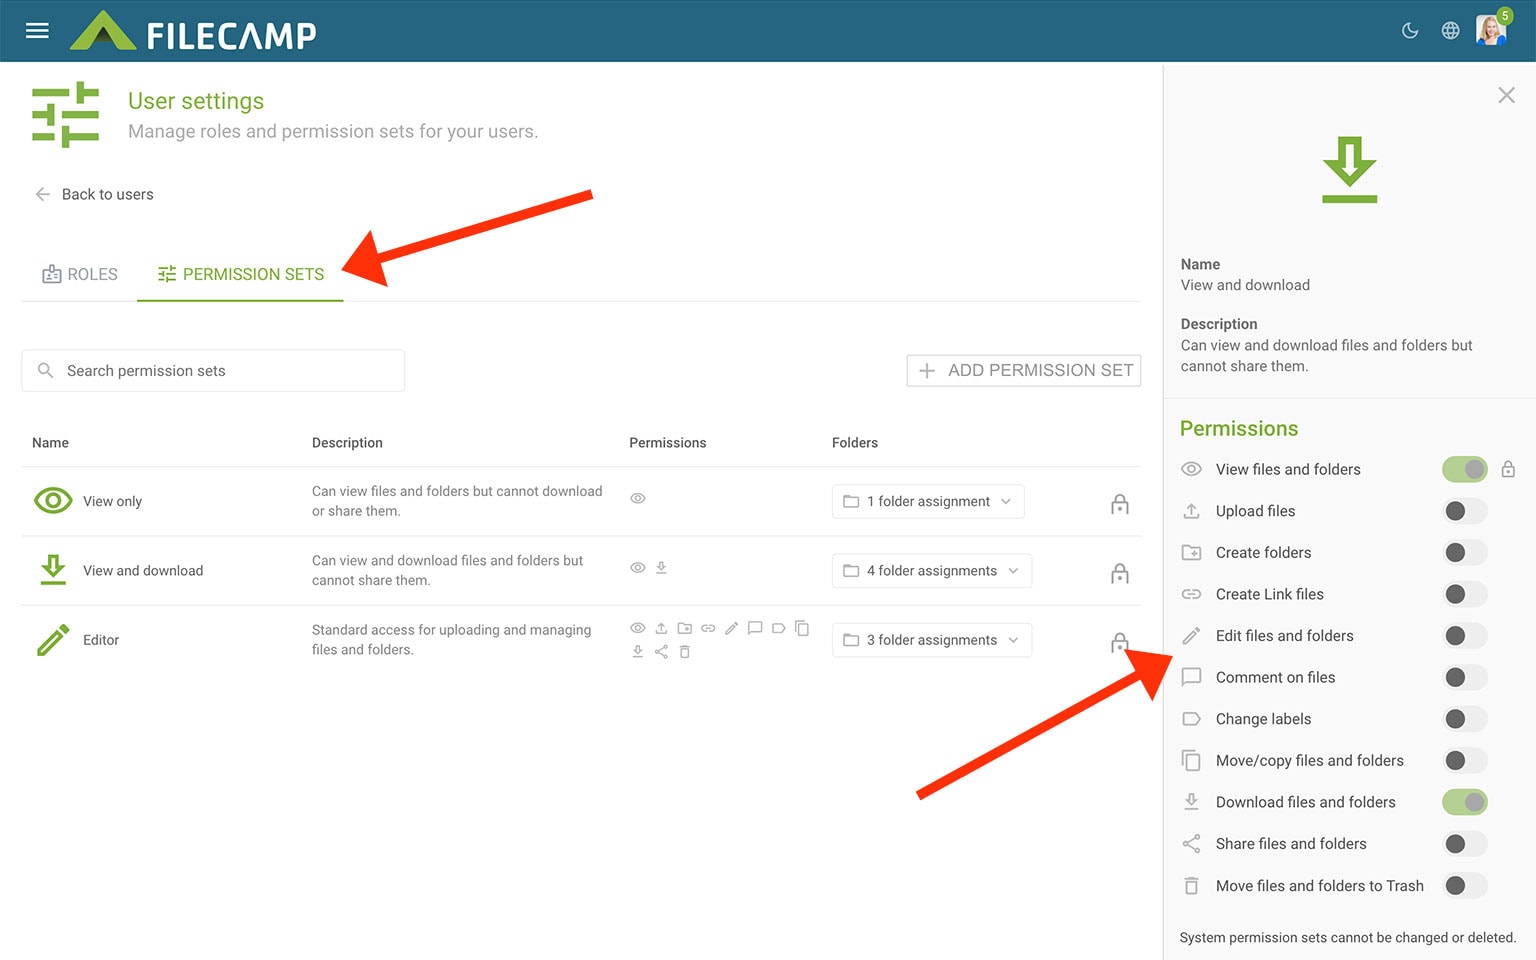
Permission sets define what users are allowed to do in folders they can access.
Permission sets are reusable. The same Permission set can be used for folder access through a Role or for direct folder access assigned to an individual user.
Filecamp includes three built-in Permission sets:
- View only – users can view files and folders but cannot download or share them.
- View and download – users can view and download files and folders but cannot share them.
- Editor – standard access for uploading and managing files and folders.
The built-in Permission sets are locked and cannot be changed or deleted.
You can also create your own custom Permission sets when you need a different combination of permissions.
Tip: Roles determine which folders users can access. Permission sets determine what they can do in those folders.
Important facts about Permission sets:
- Permission sets define what users are allowed to do in the folders they can access.
- Filecamp includes three built-in Permission sets: View only, View and download, and Editor. You can also create your own custom Permission sets.
- View files and folders is always included and cannot be disabled.
- Access assigned to a folder is inherited by all its subfolders.
- If a user receives access through multiple Roles or direct folder access, the permissions from those assignments are combined.
- Changing a custom Permission set affects every folder assignment where that Permission set is used.
Create or edit a Permission set
Navigate to Admin > Users > User settings > Permission sets.
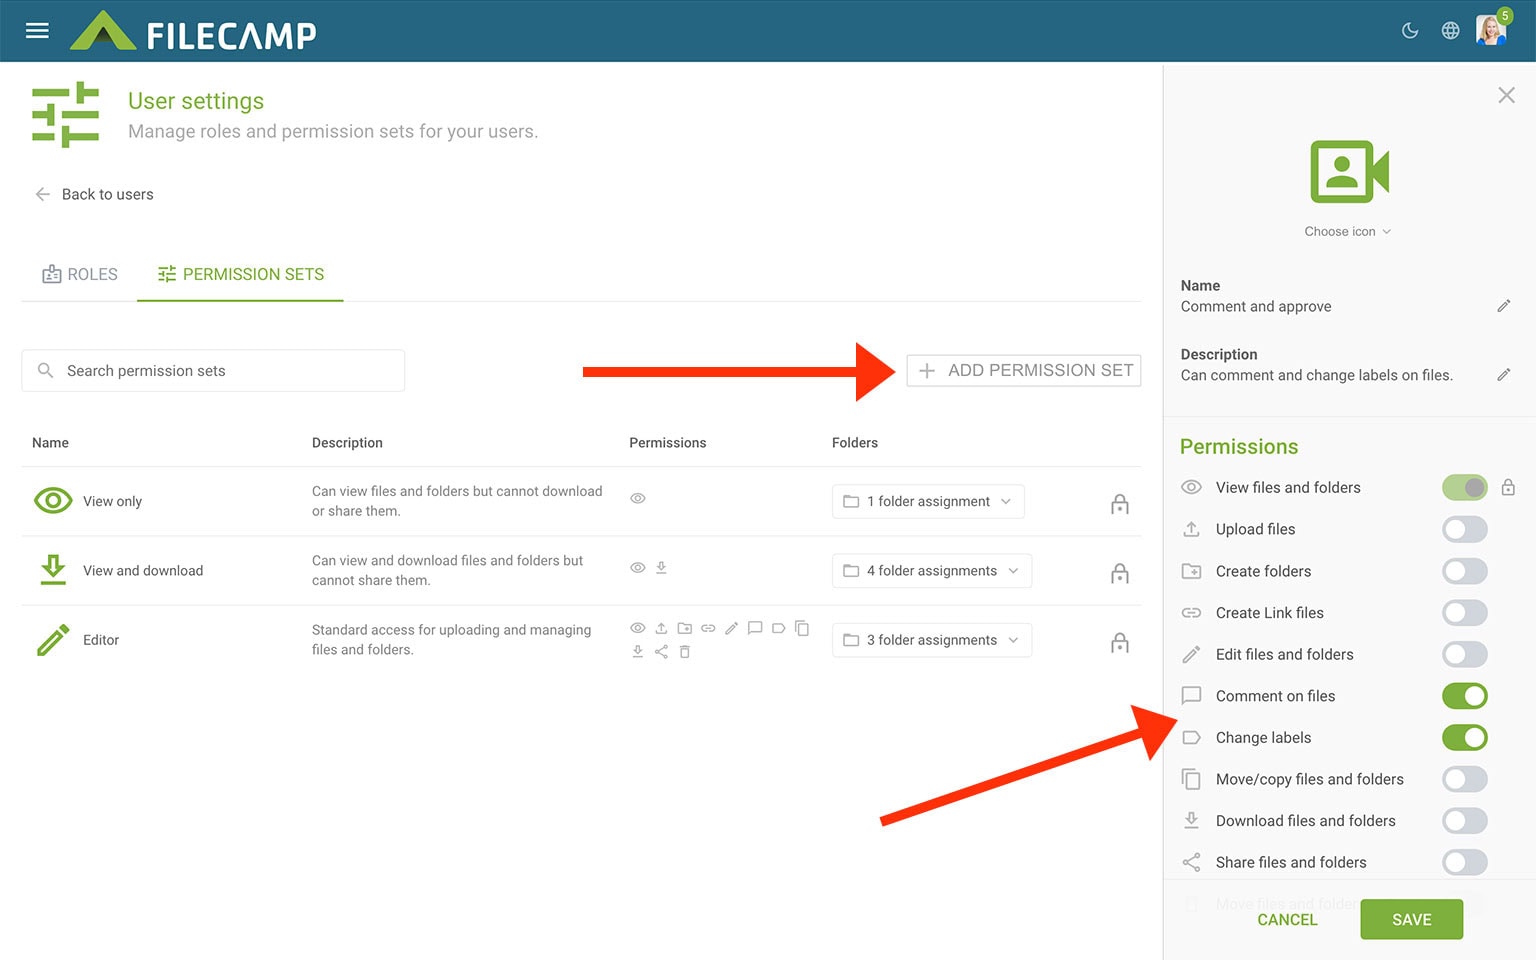
Click ADD PERMISSION SET to create a custom Permission set, or select an existing custom Permission set to edit it.
For each custom Permission set, you can define:
- Icon – choose an icon that makes the Permission set easy to recognize.
- Name – for example “Upload only” or “Agency contributor”.
- Description – explain what the Permission set is intended for.
- Permissions – choose which actions users are allowed to perform.
Available permissions include viewing files and folders, uploading files, creating folders and Link files, editing files and folders, commenting, changing labels, moving or copying files and folders, downloading, sharing, and moving items to Trash.
View files and folders is always included in a Permission set and cannot be disabled.
The Folders column shows how many folder assignments currently use each Permission set.
Important: Permission sets are reusable. If you change a custom Permission set, the updated permissions apply everywhere that Permission set is used.
Account Owner
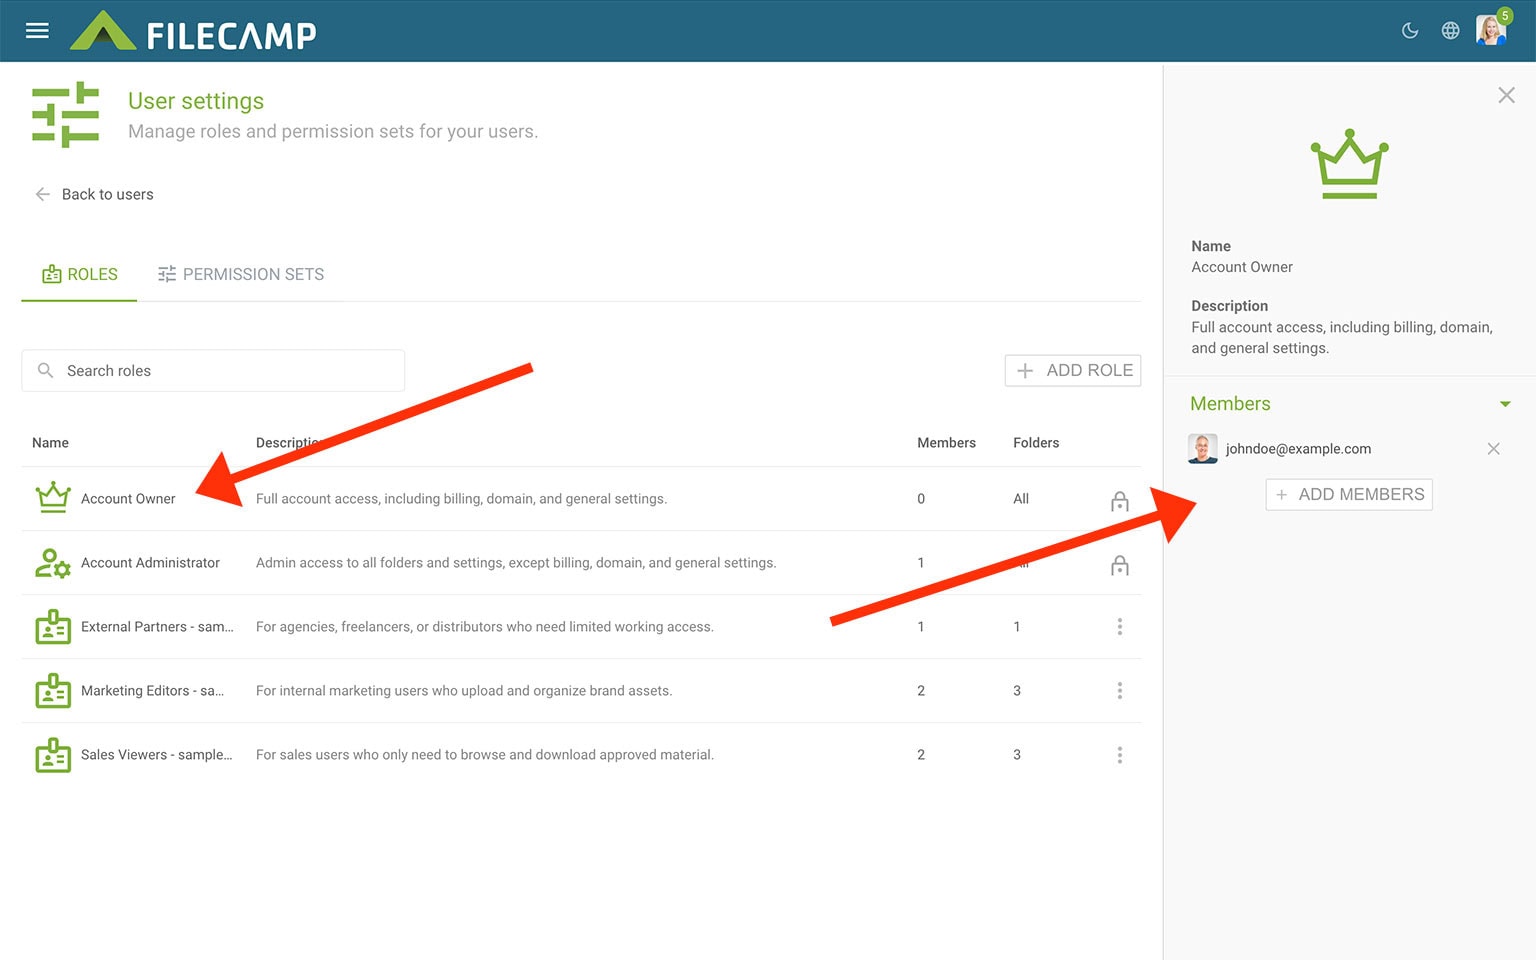
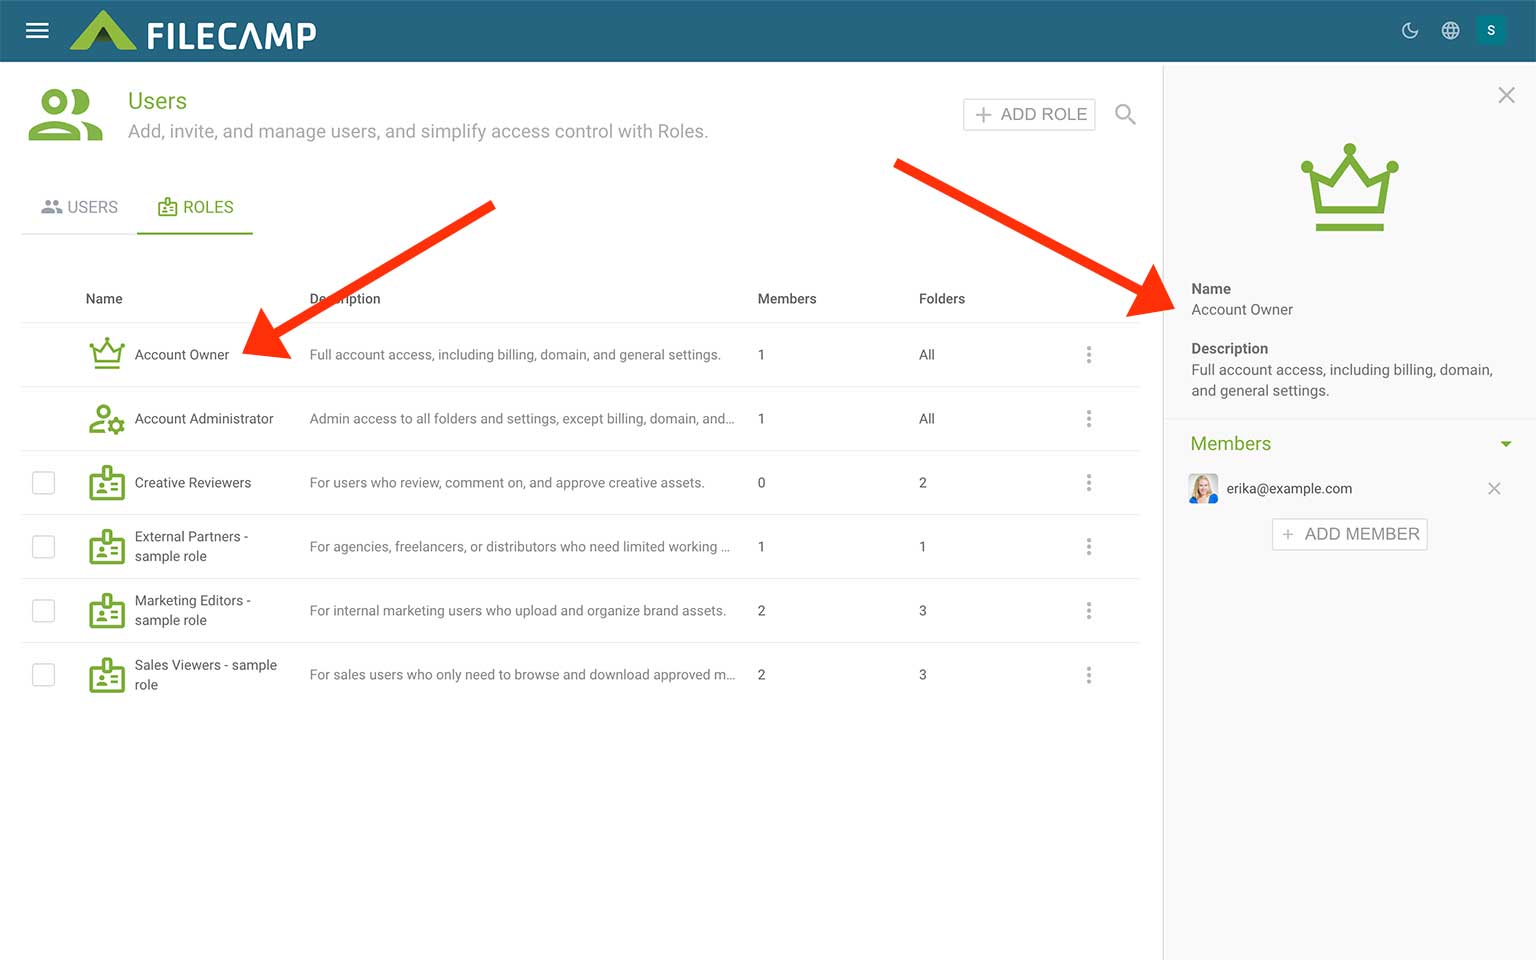
The Account Owner Role gives full access to all folders and all account settings, including billing, domain, and general settings.
The person who starts the free trial or creates the account automatically becomes the first Account Owner. Additional Account Owners can be added later.
Every account must have at least one Account Owner.
The Account Owner Role is a built-in system Role and cannot be deleted.
Filecamp user roles and permissions management screen showing various user roles and settings.
Important facts about Account Owners:
- Account Owners always have access to all folders.
- Account Owners can manage users, Roles, billing, domain settings, and all admin areas.
- Account Owners must have a valid email address as their username.
- Only Account Owners and Administrators can view and edit other Account Owners and Administrators.
Account Administrator
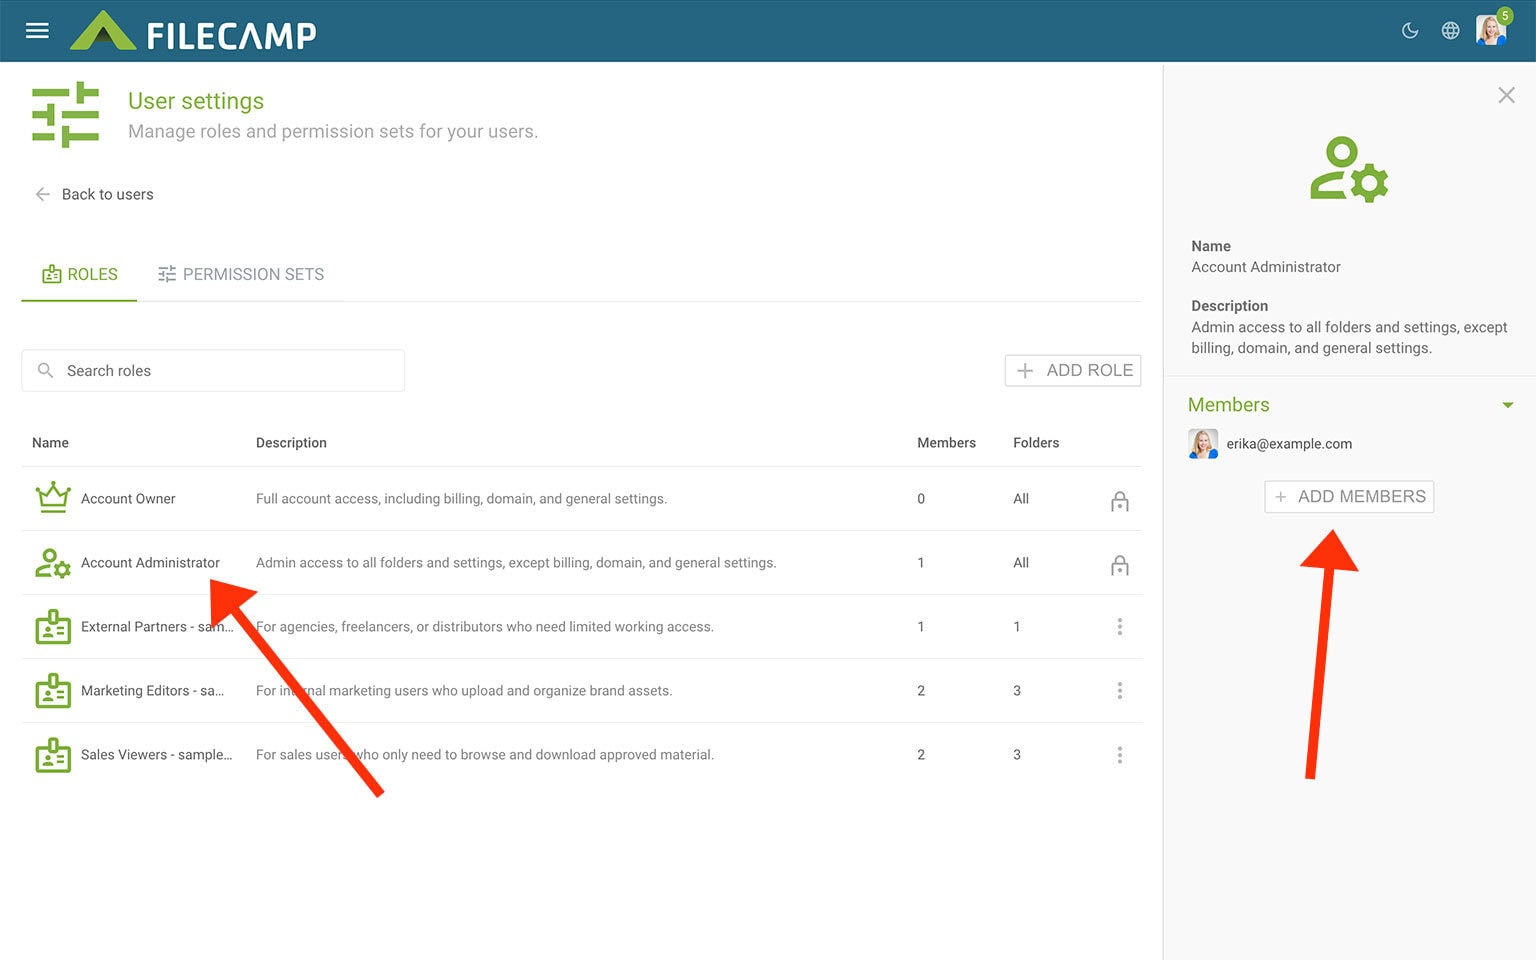
The Account Administrator Role gives access to all folders and administrative settings, except billing, domain, and general account settings.
Account Administrators do not need folder access assigned through other Roles or direct folder access. Their Account Administrator Role gives them access to all folders automatically.
The Account Administrator Role is a built-in system Role.
Filecamp user roles management interface showing account administrator and member roles with options to add roles and manage permissions.
Important facts about Account Administrators:
- Administrators always have access to all folders.
- Administrators can manage users and Roles.
- Administrators must have a valid email address as their username.
- You can have as many Administrators as you like.
Tip: You can search for Account Owners and Administrators by typing “owner” or “admin” in the Users list search field.
Direct folder access
Direct folder access gives one specific user access to a folder outside of their assigned Roles.
Use direct folder access for individual exceptions. For example, if one user needs access to a private client folder that should not be added to a shared Role.
To add direct folder access:
- Navigate to Admin > Users.
- Select the user you want to edit.
- Go to Folder access.
- Click ADD DIRECT ACCESS.
- Select the folder you want to give access to.
- Select the Permission set that should apply.
Folder access inherited through a Role is also shown in the user’s Folder access section. Role-based access should be changed through the Role itself.
Tip: Use Roles when several users need the same access. Use direct folder access for individual exceptions.
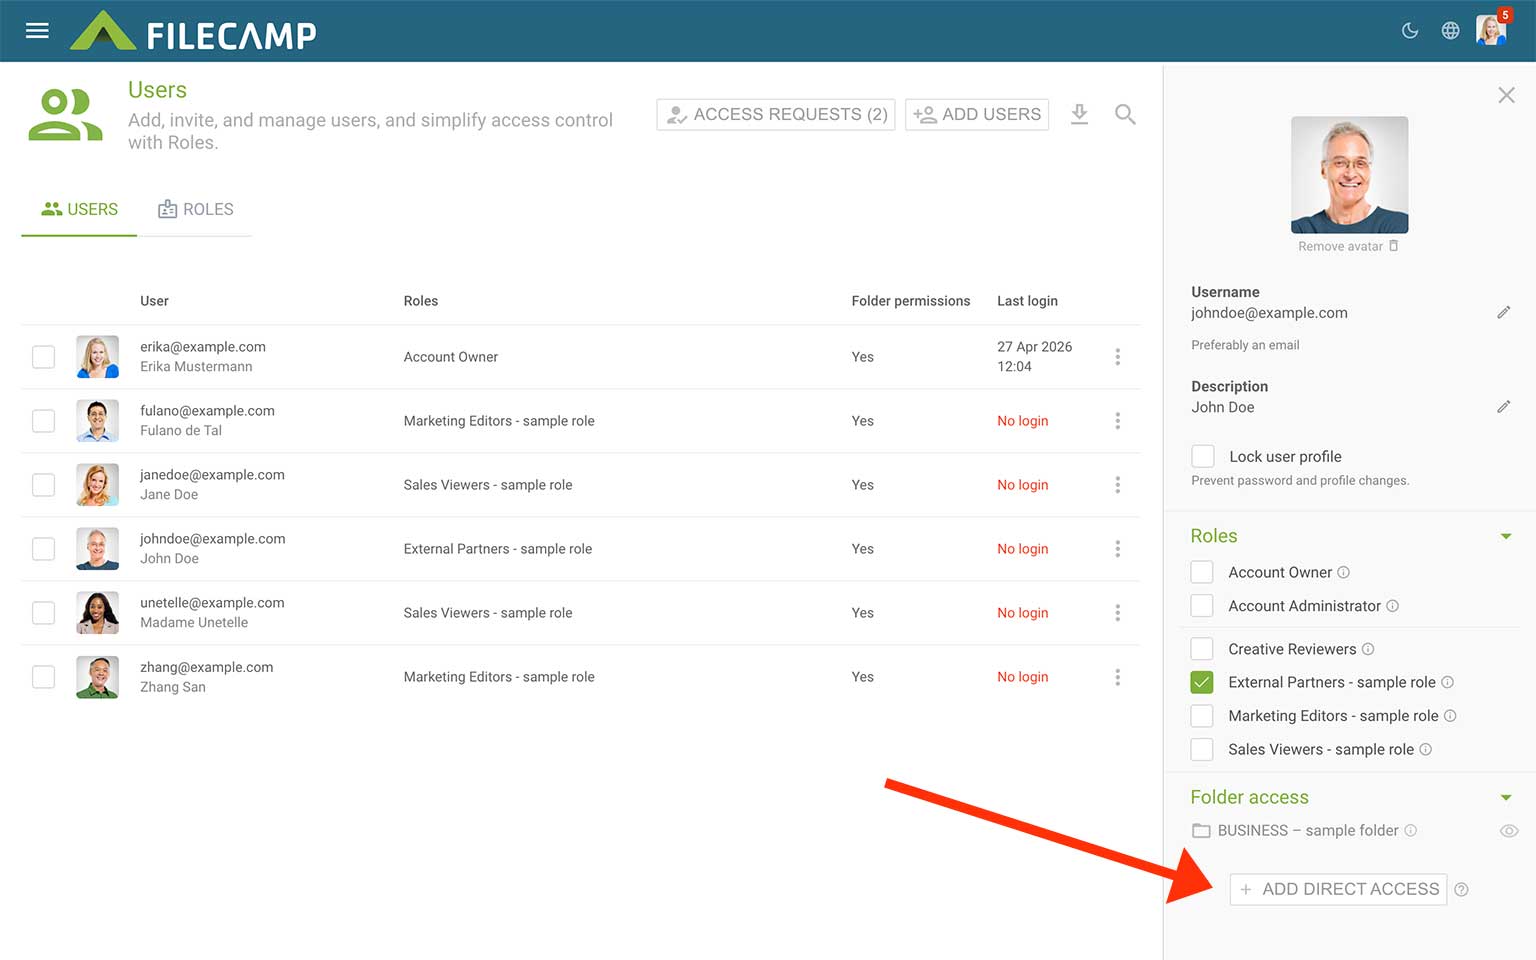
Tip: Use direct folder access for individual exceptions. For example, if a single user needs access to a private folder, add the folder under Folder access instead of creating or changing a shared Role.
Important: If a user has no Roles and no direct folder access, the user will not have access to any folders.
Folder permissions
You can also manage access directly from a folder.
Navigate to the folder, open the folder menu, and choose Permissions.
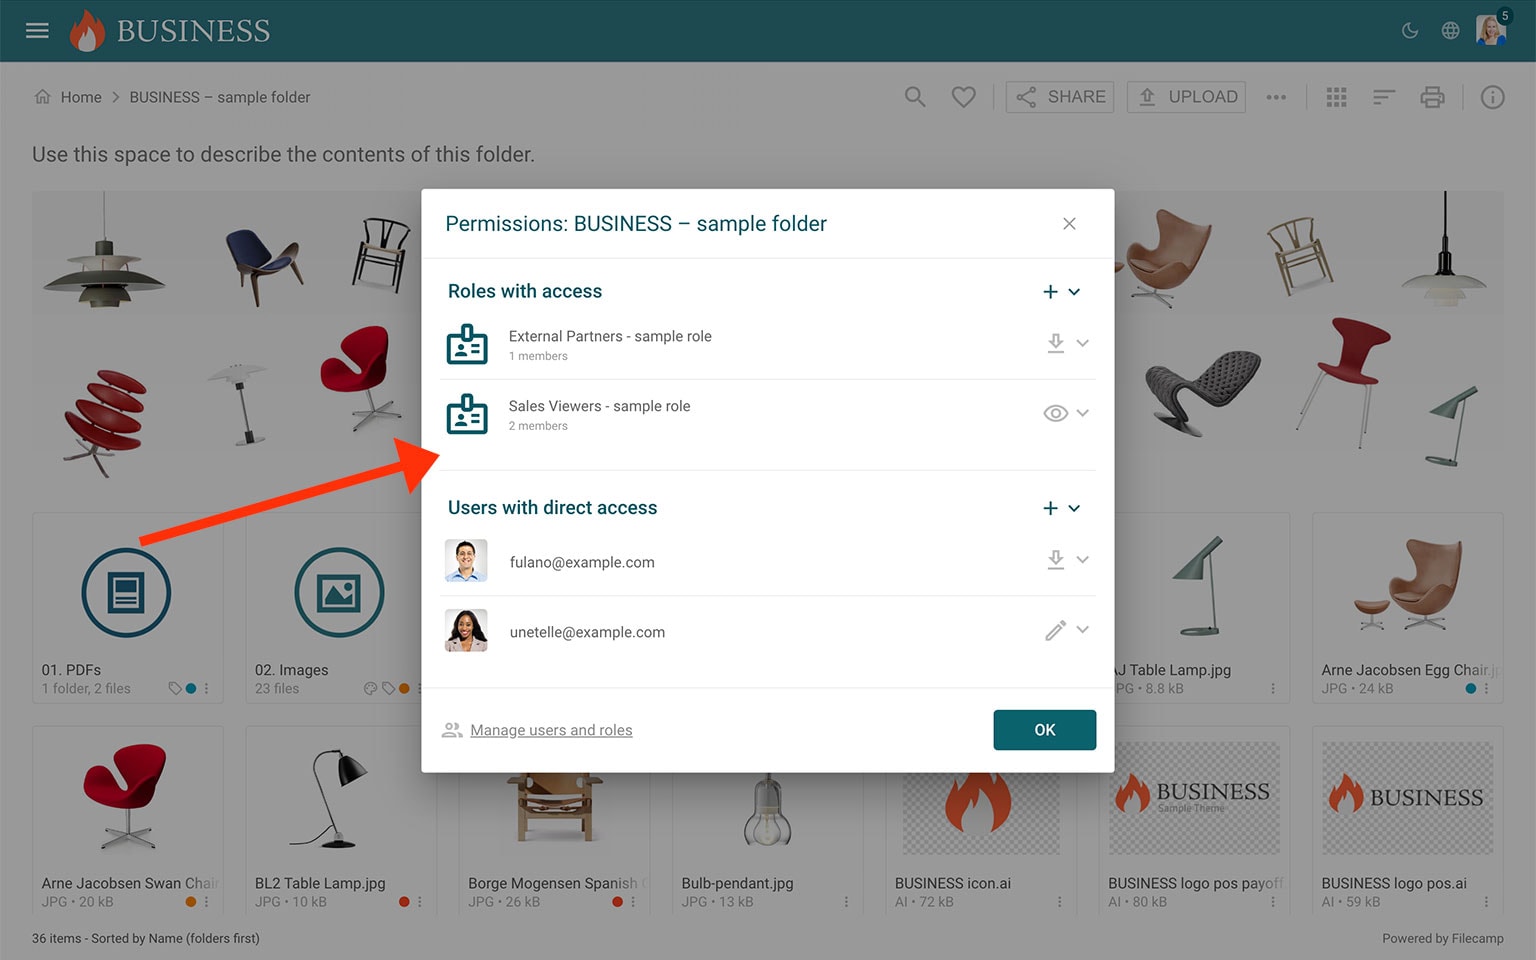
The Folder permissions window is divided into two sections:
- Roles with access – Roles that give their members access to this folder.
- Users with direct access – individual users who have been given access to this folder directly.
The Permission set used for each assignment determines what the Role members or individual user can do in the folder.
You can add or remove Roles and users and change the Permission set assigned to their folder access.
Notice: Account Owner and Account Administrator are not shown as normal folder access because they always have access to all folders.
Tip: Users and their folder access can also be managed from Admin > Users.
For more details about managing folder access, see our Folder permissions guide.
Notice: Account Owner and Administrator Roles are not shown as normal folder access, because they always apply to all folders.
Lock user
Enable Lock user profile if you want to prevent the user from changing their own login credentials and profile details.
Locked users cannot change their username or password. Locked users are also not able to create Collections, use Favorites, or set up Notifications.
This can be useful if several people share the same login, but in general we recommend creating individual users and managing their access with Roles.
Invite user
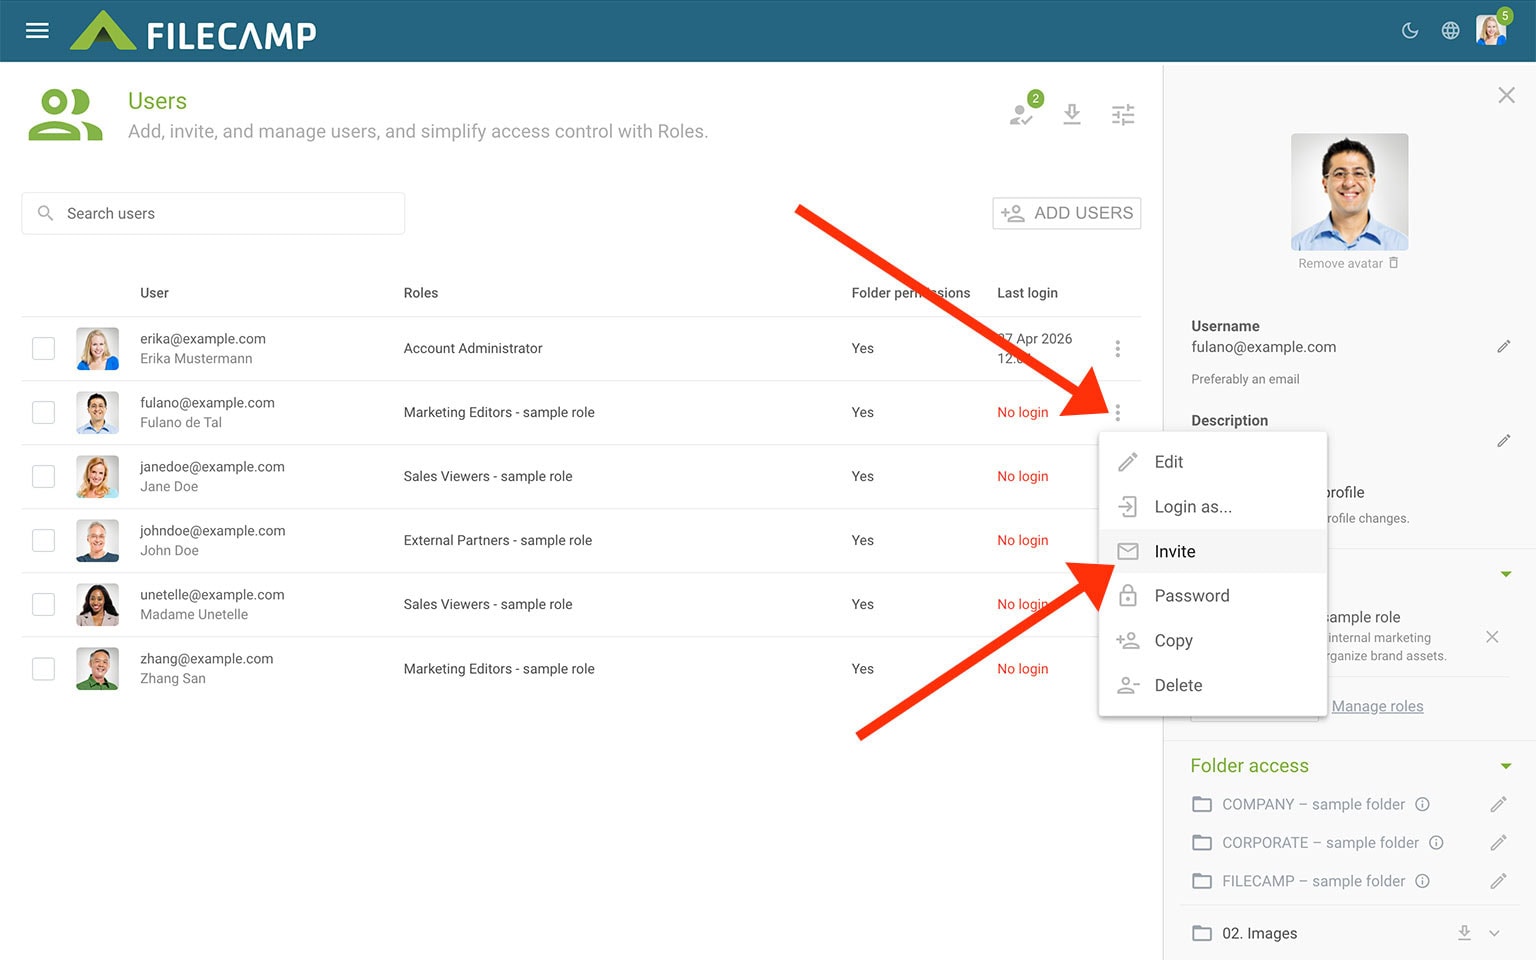
You can send or resend an invitation email to users with email addresses.
Navigate to Admin > Users, click the three-dot menu next to the user, and choose Invite.
The user’s password will be reset, and an email will be sent to the user with a link where they can create a password and log in.
Notice: For security reasons, invitation links are single-use only. After the first click, they will no longer work.
Access Requests
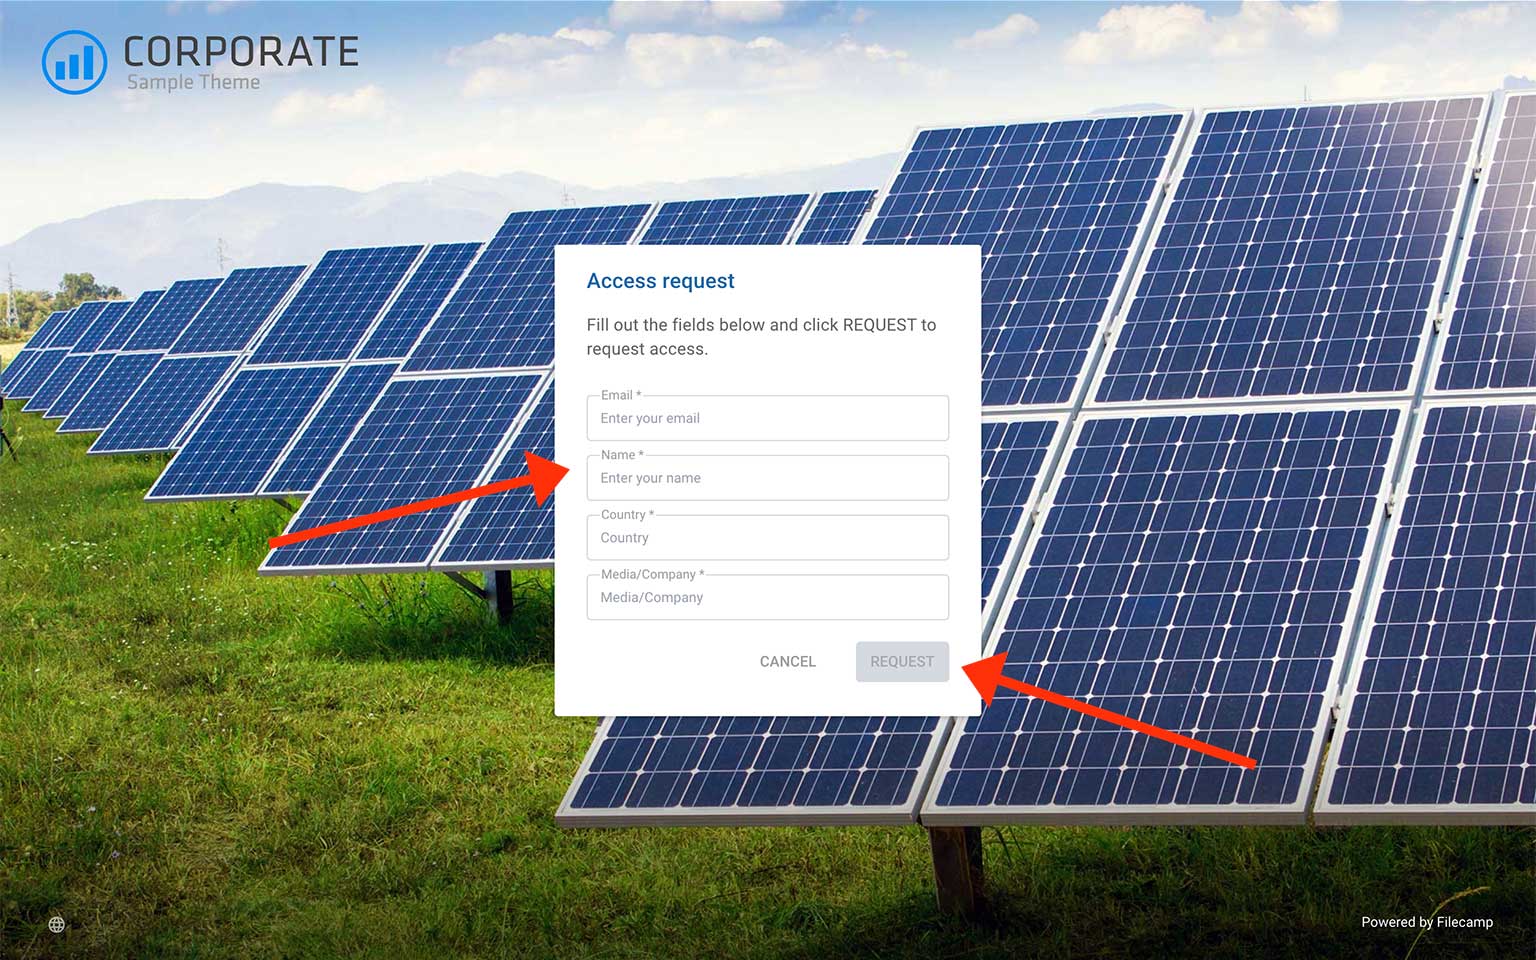
Filecamp’s Access Requests feature lets new users request access directly from the login page. They can fill in a simple form with their email address, name, and any custom fields you have added.
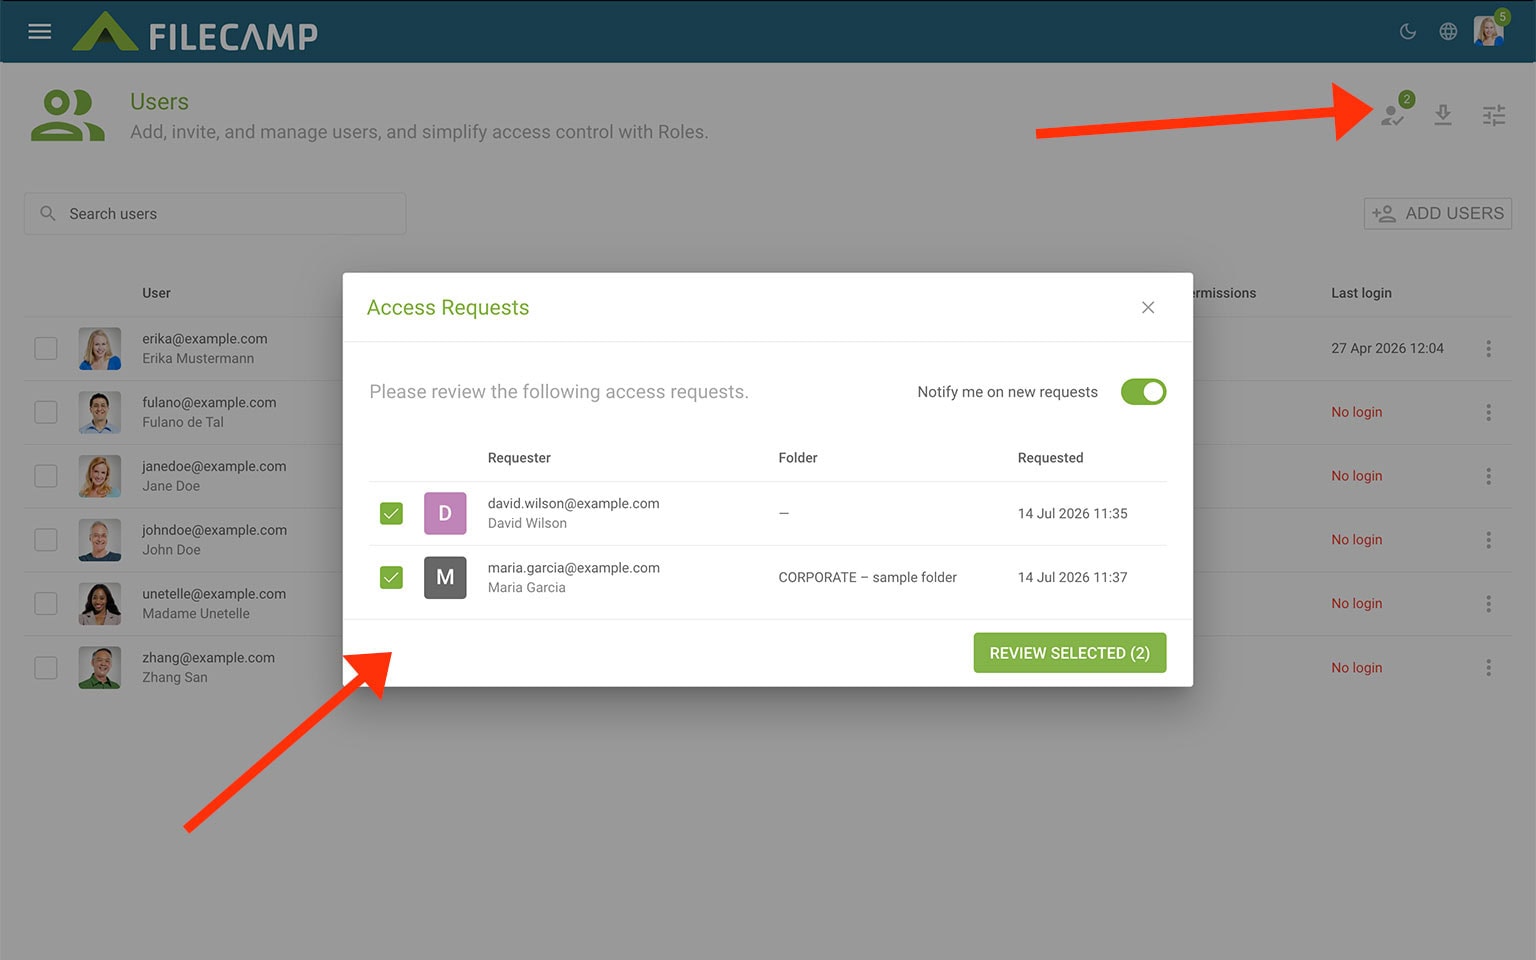
Administrators can review pending Access Requests from Admin > Users.
When approving an Access Request, assign one or more Roles to the user. If needed, you can also create a new Role before approving the request.
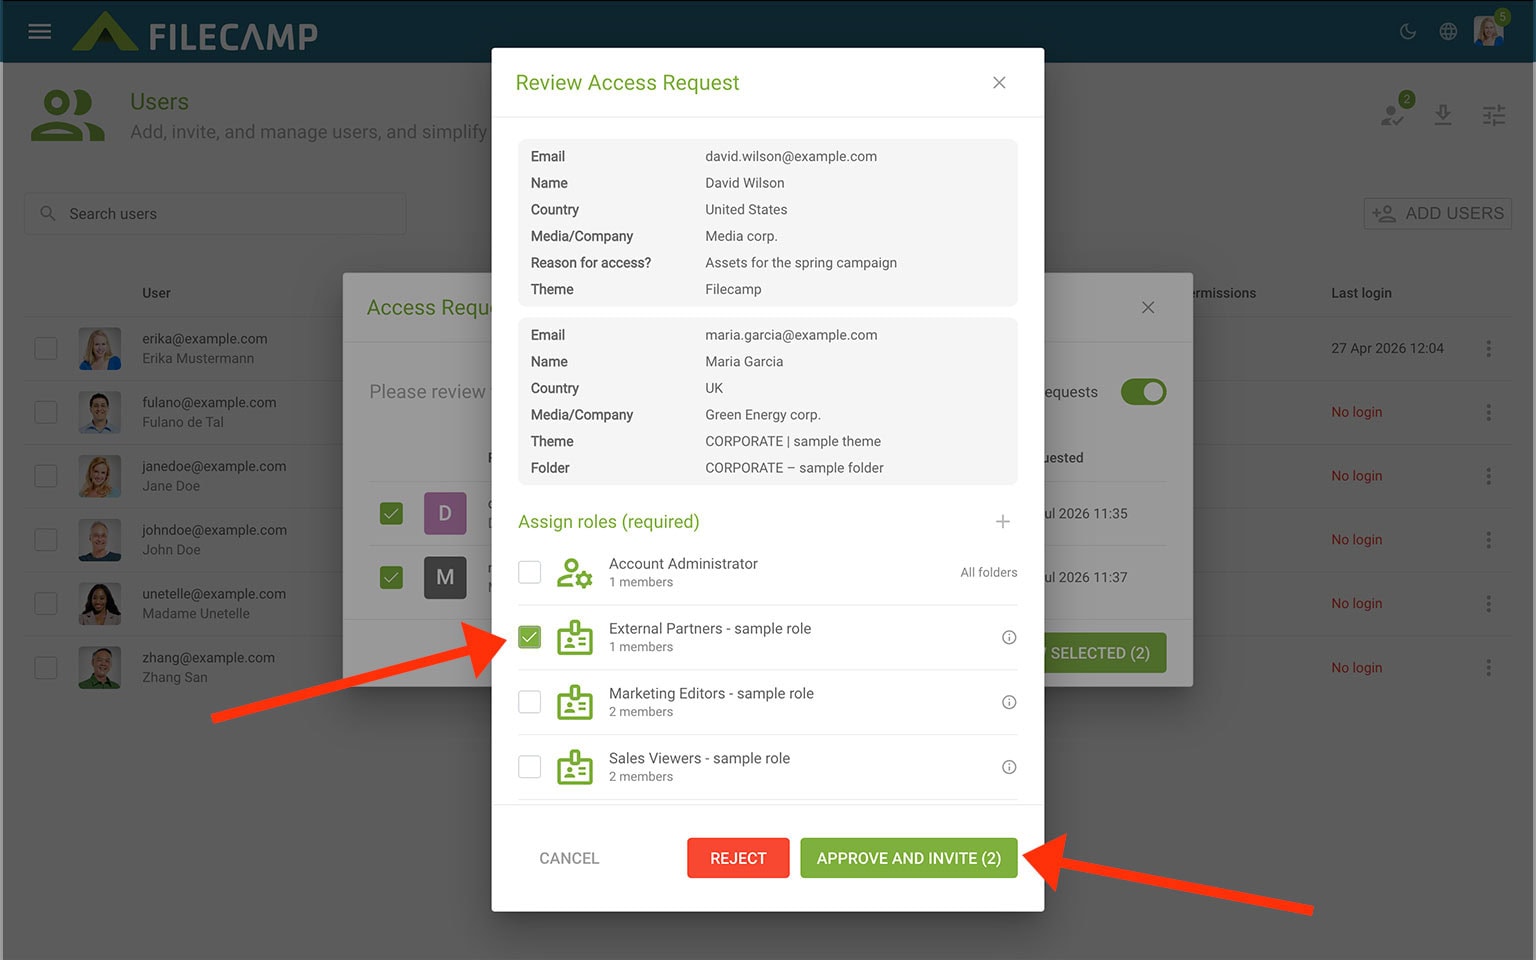
If an Access Request is rejected, the request is deleted, the user is not created, and no access is granted.
Administrators can choose to receive email notifications when new Access Requests are submitted.
Enable Access Requests
Access Requests can be enabled or disabled on the Theme level. If you use multiple Themes, you can enable Access Requests for some Themes only. Read more about Themes.
Custom input fields in the Access Request form
You can add custom fields to the Access Request form.
The text entered in these custom fields is shown when approving the request. It is also included in the email notification if you have enabled notifications for new requests.
Change a user’s password
Administrators can change the password for an existing user.
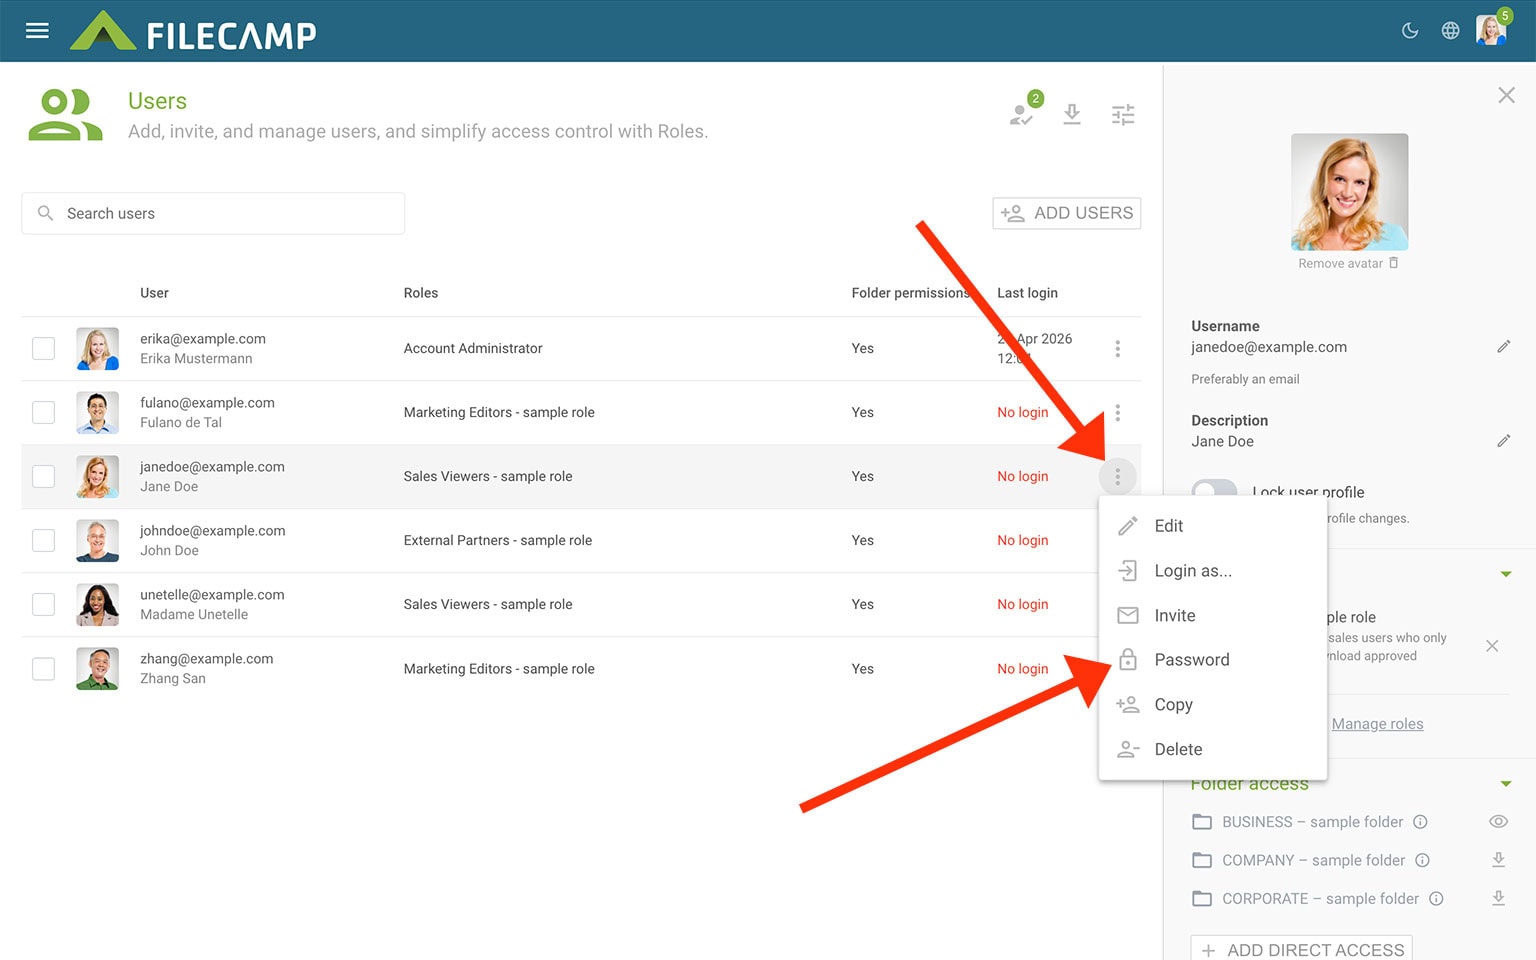
Navigate to Admin > Users, click the three-dot menu next to the user, and choose Password.
Type the new password twice to confirm it, then click SAVE.
Delete user
Navigate to Admin > Users.
Click the three-dot menu next to the user and choose Delete.
The user will be deleted and will no longer have access to your Filecamp account.
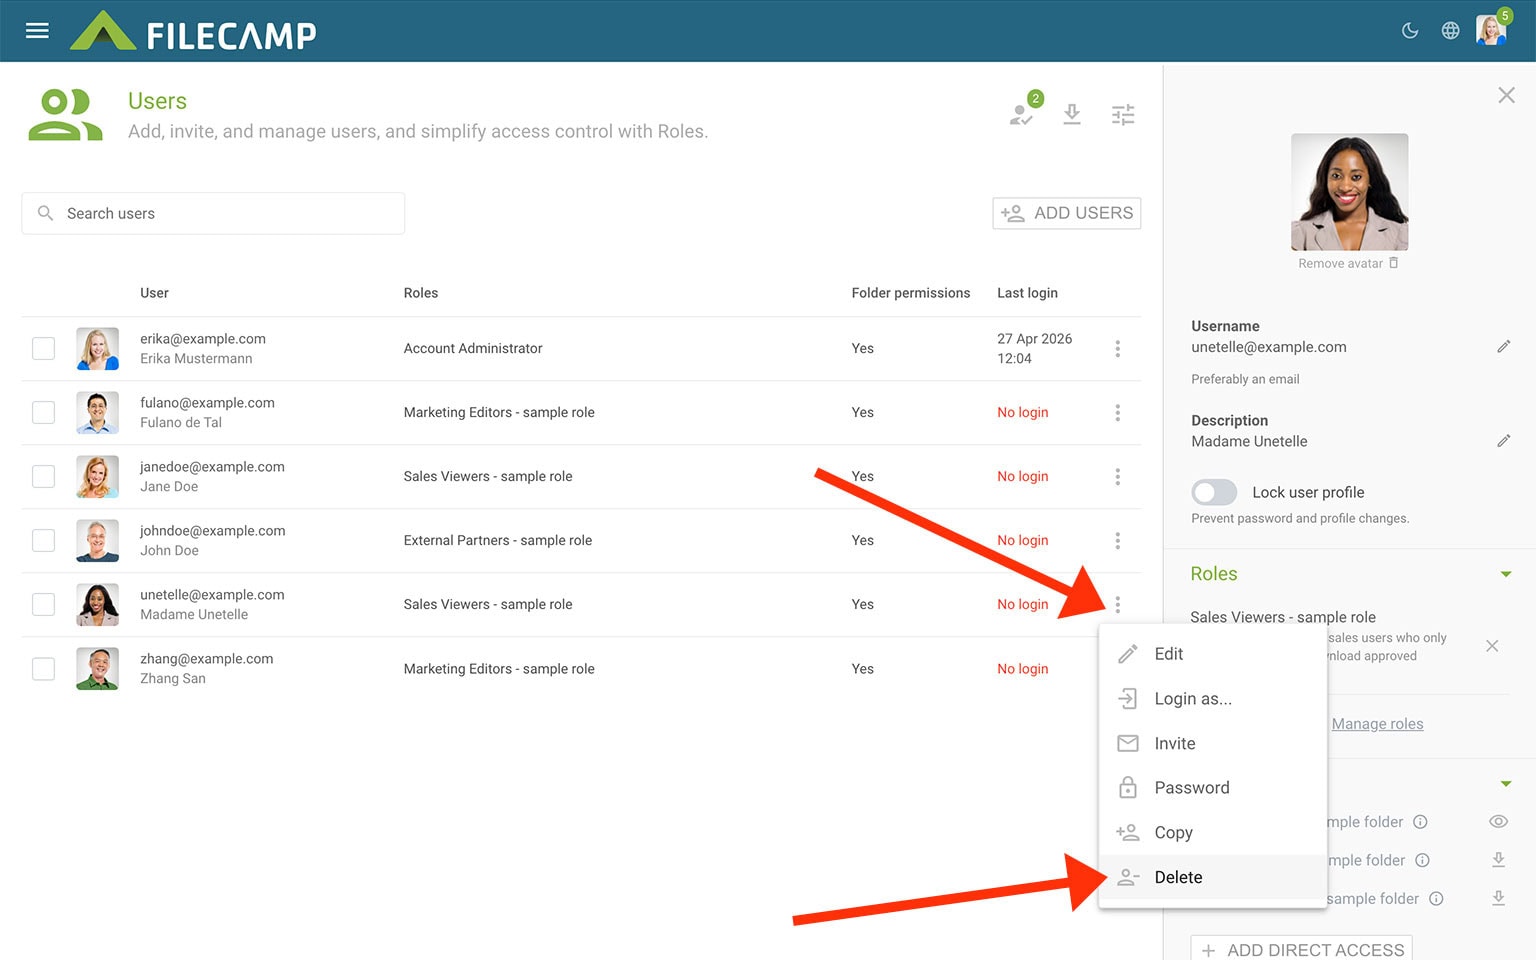
Log in as another user
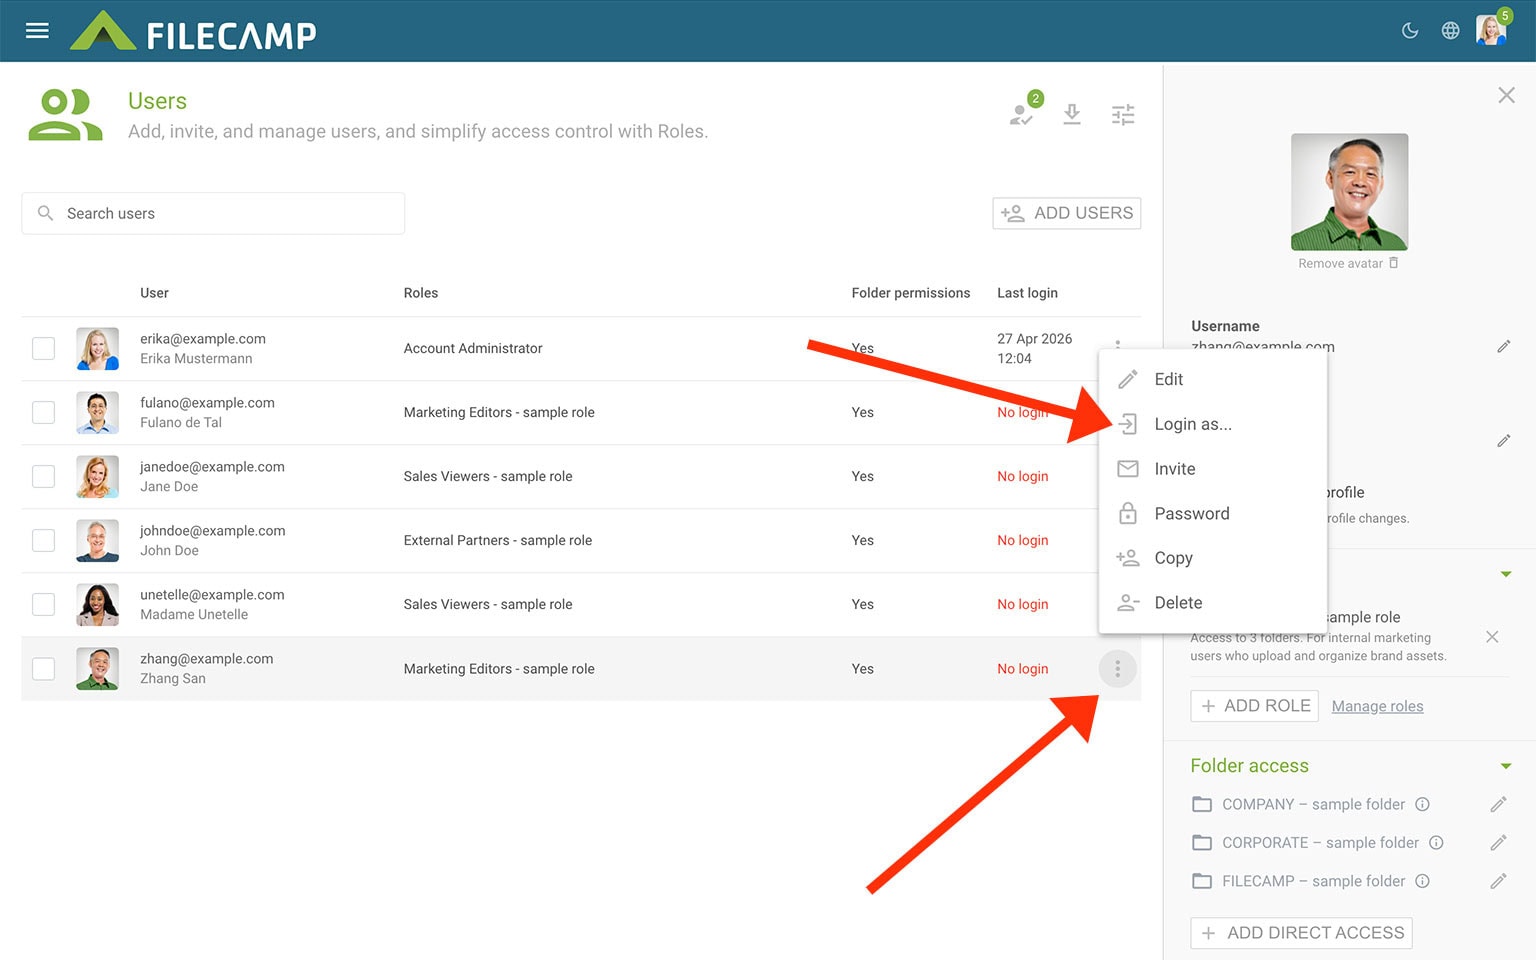
To log in as another user:
- Go to Admin > Users.
- Find the user you want to impersonate.
- Click the three-dot menu in the Users list.
- Choose Log in as.
You will now be logged in as that user in the same browser tab.
A persistent notice is shown while you are logged in as another user.
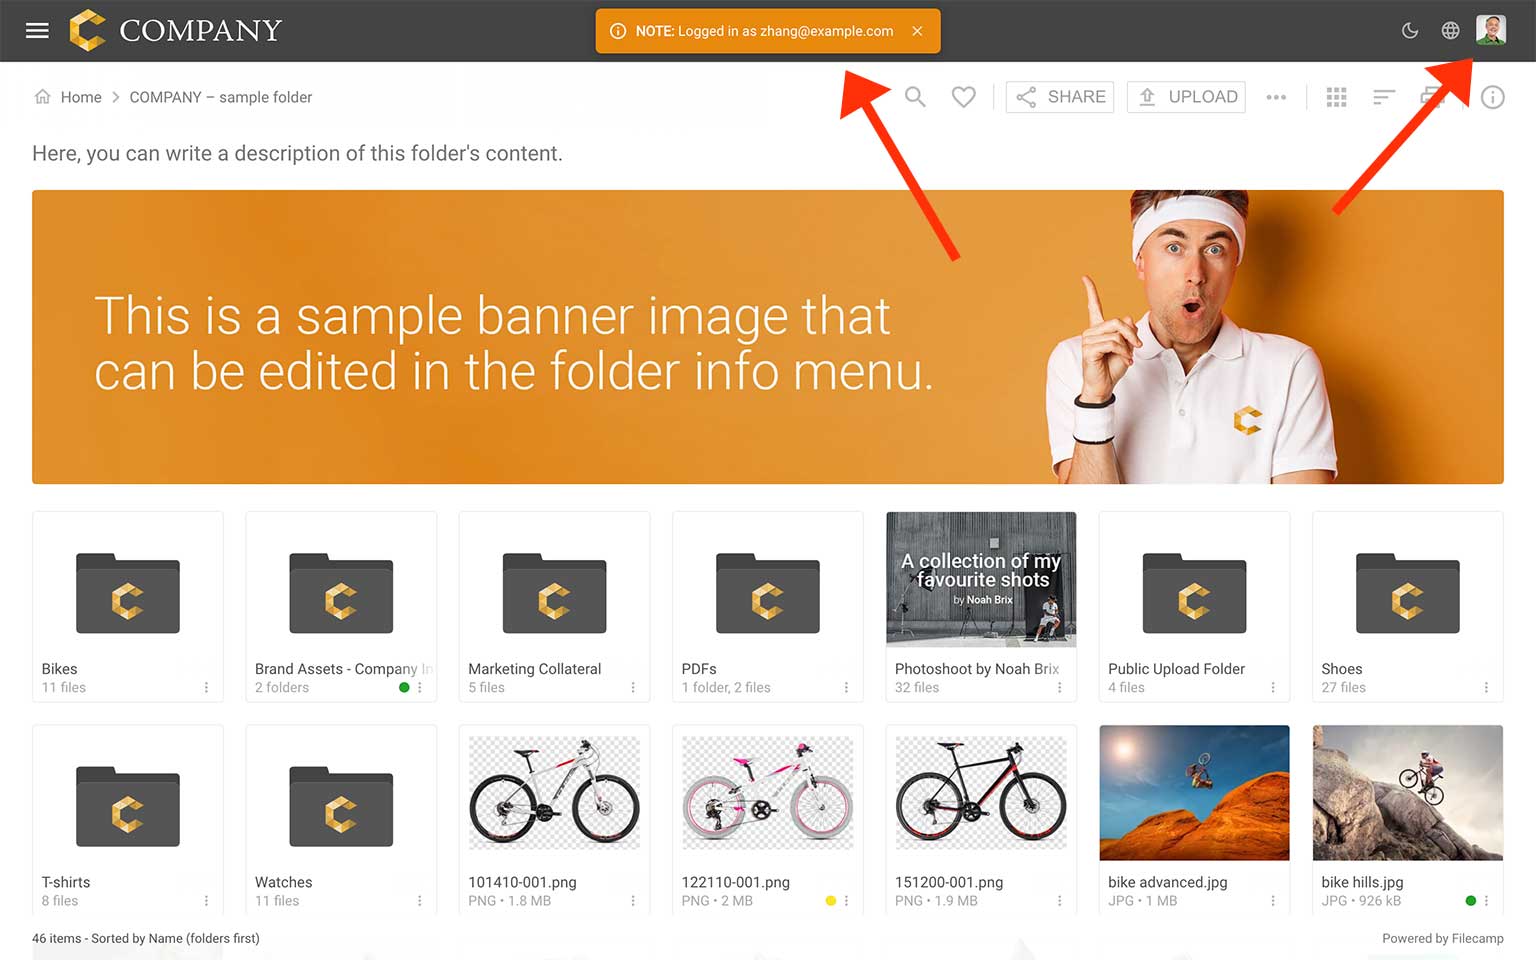
When you have finished checking the account from the user’s perspective, click EXIT to return to your own login.
Delete multiple users
Navigate to Admin > Users.
Select the users you want to delete, then click DELETE in the Bulk Action Bar.
All selected users will be deleted and will no longer have access.
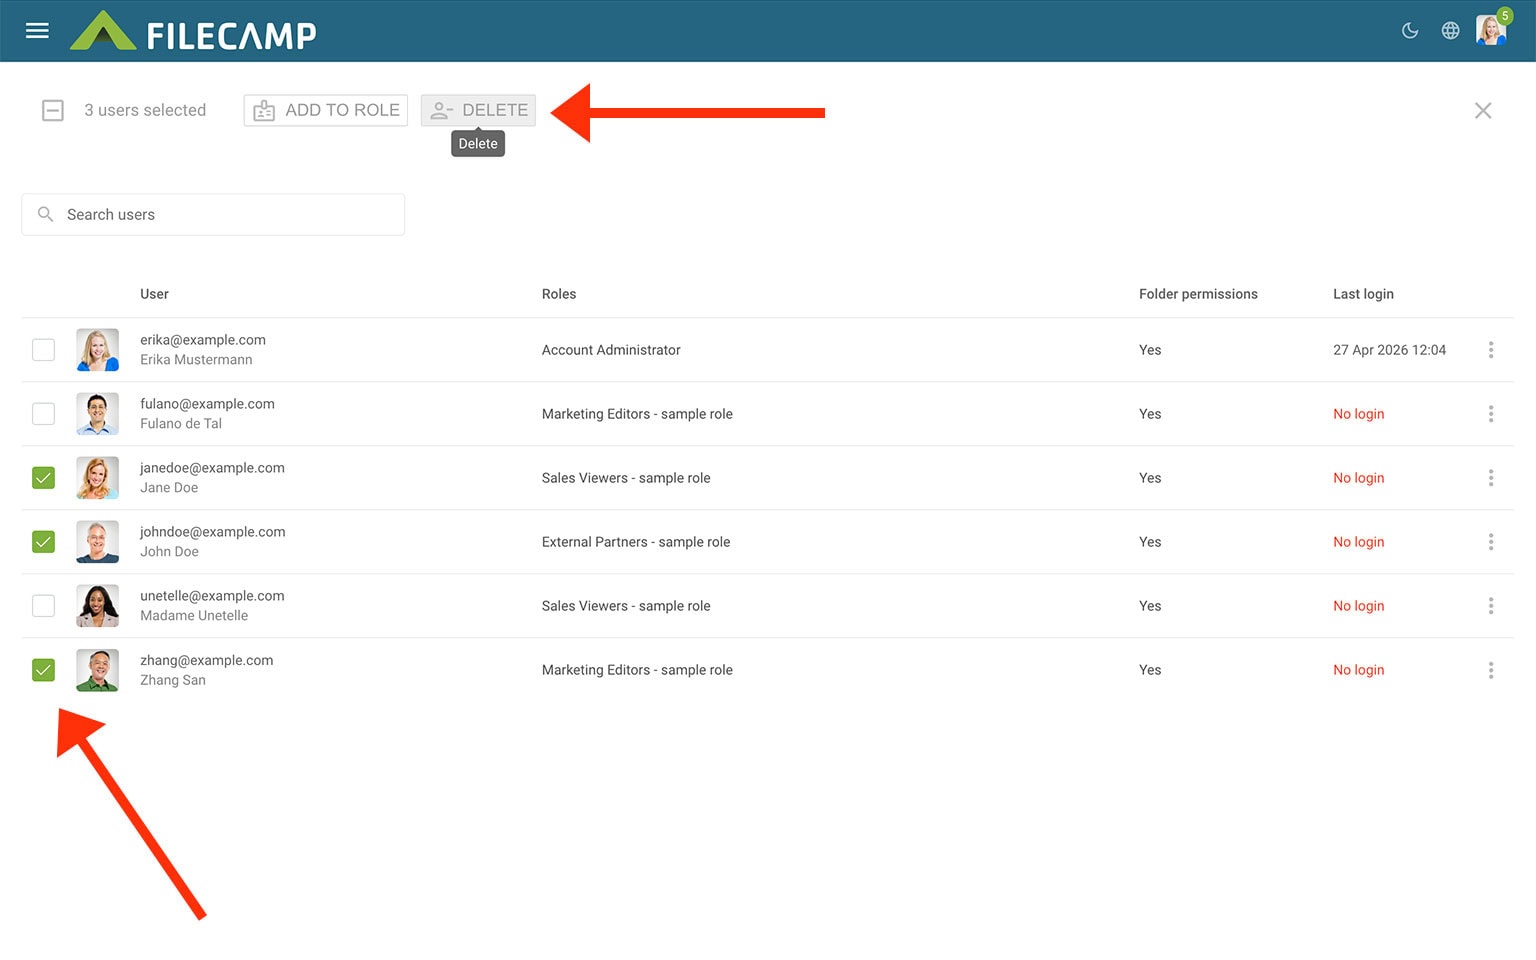
Tip: To select adjacent users, click the first user, press and hold the SHIFT key, then click the last user.
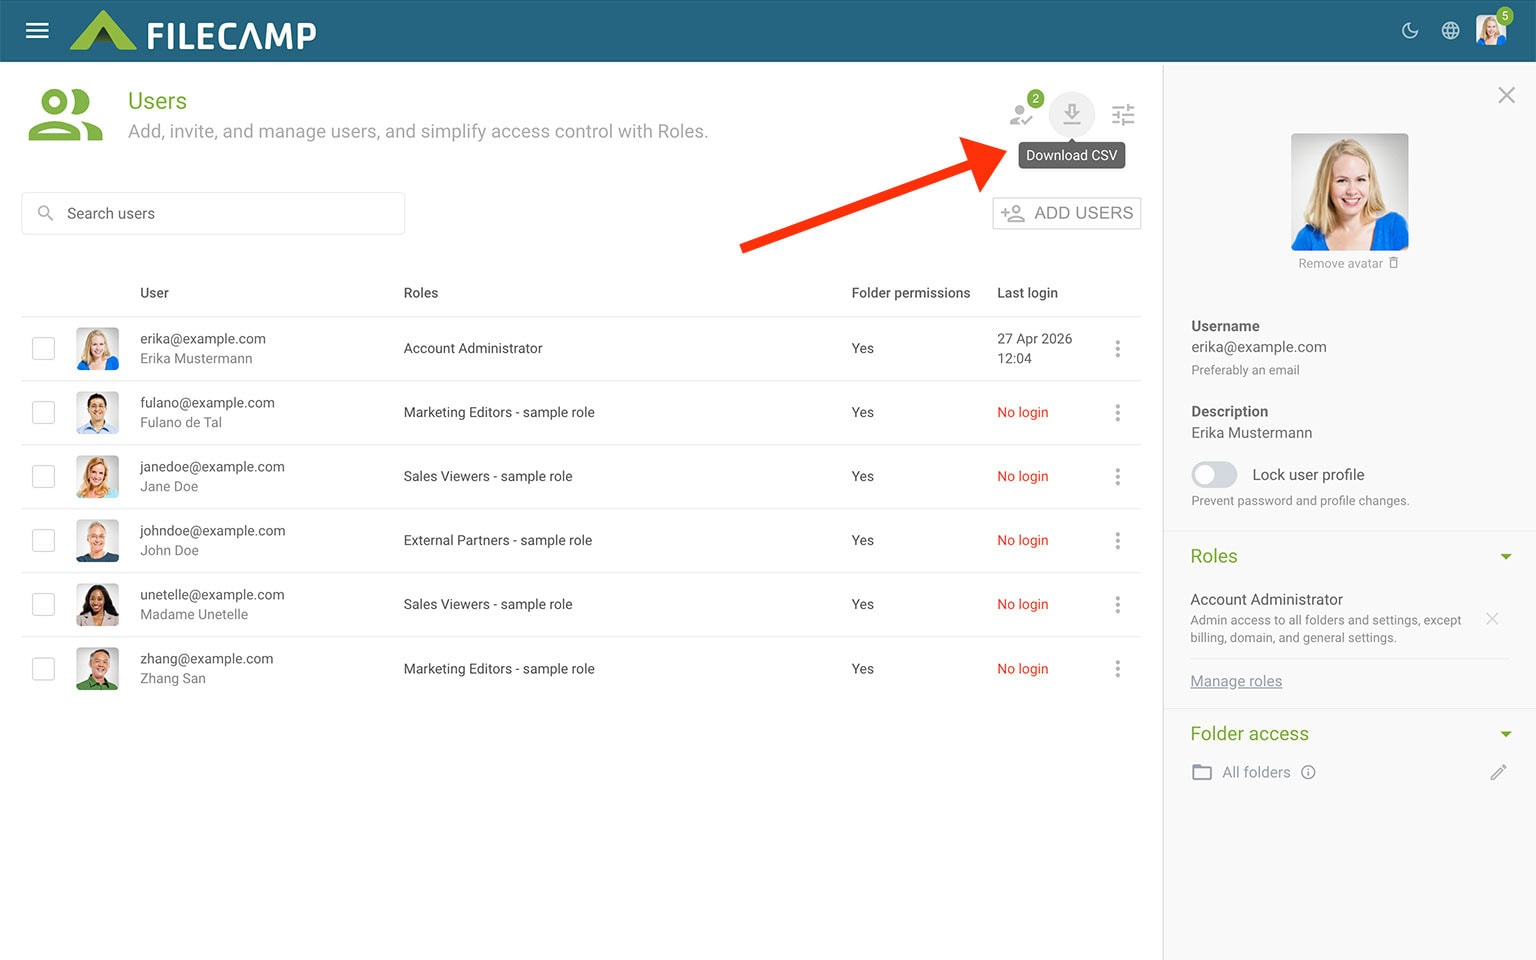
Download users as a CSV file
You can download your user list as a CSV file.
Click the Download icon in the Toolbar to download a list of all users.
CSV files can be opened in spreadsheet programs such as Microsoft Excel or Google Sheets.
This article reviews the following topics:
- Add users
- Editing a user
- User settings
- Roles
- Create or edit a Role
- Add selected users to a Role
- Permission sets
- Create or edit a Permission set
- Account Owner
- Account Administrator
- Direct folder access
- Folder permissions
- Lock user
- Invite user
- Access Requests
- Change a user’s password
- Delete user
- Log in as another user
- Delete multiple users
- Download users as a CSV file
Tip: Click the avatar icon to upload a profile image and give your user a more personal experience.
Notice: In general, we recommend using email addresses as usernames. This allows users to receive notifications, reset passwords, and manage their own login details.